We’ve designed a series of nine steps, with how-to info, to help you with your class blogging.
This step is to add your students as users to your class blog so they can write posts on it.
Why Add Students As Users To Class Blogs?
Normally when a class blog is initially set up you’ll be responsible for writing posts, and the students respond by writing comments.
This gives you time to increase your skills while gradually introducing your students to blogging and educating them on appropriate online behaviour.
However, ultimately you’ll need to make decisions:
- Do you want students to write posts on the class blog?
- Do you want them to have their own student blog?
Factors you need to consider include student’s age, time and motivation.
As student’s age increases you are more likely to want them to write posts on the class blog or their own blog (i.e. as a general rule Kindergarten and Grade 1 students write comments only).
Ownership and Motivation
Ownership is an important part of blogging; as it’s an important part of life.
We all take better care of and have increased motivation when we feel personal ownership.
Students are no different from adults.
Ever tried to set up adults on a group blog? Incredibly challenging — often one person does the bulk of the publishing! Yet each individual happily posts on their own blog.
Time Involved
Increasing student’s blogging role increases the time spent providing guidance and monitoring their online activities.
However, your students learn more, are more motivated and their writing improves faster.
Check out these posts by student bloggers to see for yourself:
- Starting Out Blogging by Abbey (12 years old)
- How Blogging Has Connected me to a Global Audience by Daniel (11 years old)
- To Blog Or Not To Blog by Sam (11 years old)
PS You can create your own GraphJam here!
Introducing Blogging To Students
If you decide to increase your students’ blogging roles it’s a good idea to introduce it slowly in the following three steps:
![]() Write posts on their own student blog
Write posts on their own student blog
What Role Do You Assign Students on Blogs?
The five roles for users you can give students on class blogs or on their student blogs are: Administrator; Editor; Author; Contributor; and Subscriber.
Deciding which role to assign them is a balance between:
- How much responsibility you’re comfortable with assigning your students
- School and District guidelines
- Providing them with an environment that’s motivating
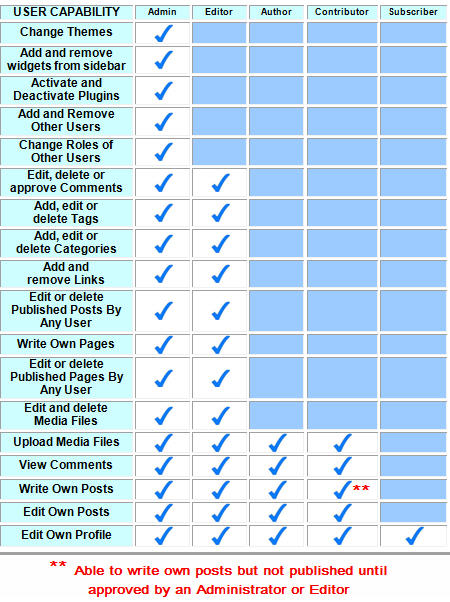
If you want to approve all posts before they can be published then assign them the role of contributors.
For more info refer to Managing Students on Blogs…What Role Do You Assign Students?
Here is a summary of their differences based on User Capability:
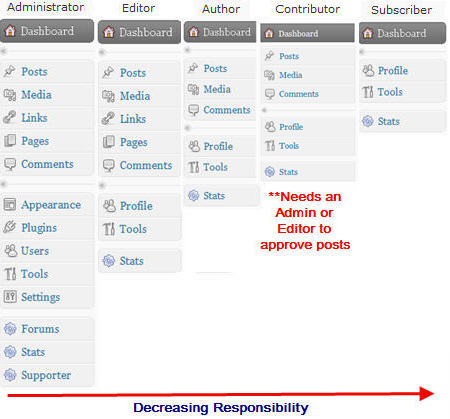
Here is a summary of their differences based on access to features in the dashboard:
How To Add Students As Users To Class Blogs
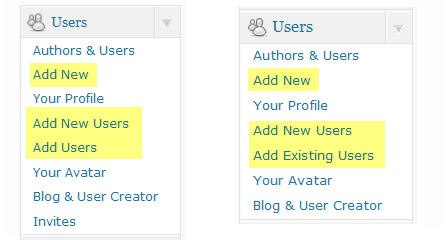
There are three main ways to add users to Edublogs:
- Users > Add New
- Users > Add New Users – Edublogs Pro and Edublogs Campus only
- Users > Add Users or Users > Add Existing Users – Edublogs Pro and Edublogs Campus only
Here’s a summary of what each is used for:
Please note:
- Add New Users is the fastest way to add students quickly to your class blog — if they don’t have a username.
- Add Users (or Add Existing Users) is the fastest way to add students quickly to your class blog — if have a username.
Refer to Creating and Adding Users to blog for detailed instructions on how to use each.
Student accounts and email address
An email address is required when you create student accounts — it’s important for password resets, comment moderation etc
If your students don’t have email addresses the simplest solution is to set up their accounts using one Gmail account and then add a + sign and a different number and/or letter(s) to the end of your email name for each student.
How it works is Gmails ignores anything in the first half of an email address after a plus sign.
So if you create each email with the format [email protected] all emails will be sent to the inbox of [email protected]
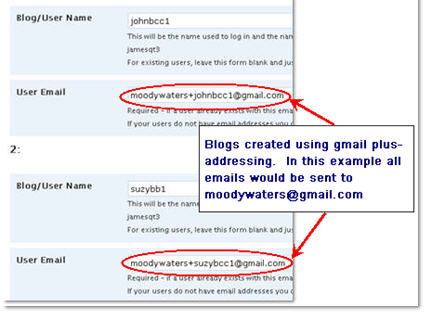
Please Note:
- You must use a real gmail account– either use your own gmail account or set up a gmail account for your class e.g. [email protected].
- This also means that if you want to moderate comments on student posts they will be sent to your email address.
Organsing Student Posts on Class Blogs
Educators new to blogging often struggle with when you write Posts as opposed to Pages.
The best way to manage your student work is they write posts and assign their name as a category to the post before they publish their post. This makes it easy to find and manage their work.
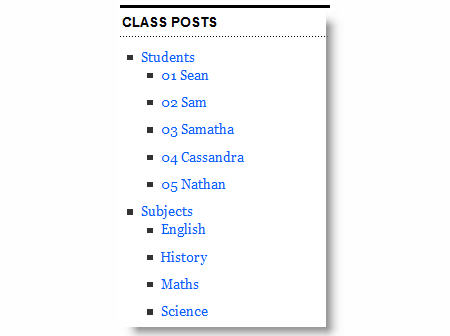
You display the categories assigned to posts in your blog sidebar using the categories widget (here is how to add widgets).
This means when you click on the name of a student in your sidebar it’ll loads a page with all posts that use that student name as a category — check this out in action on Mr.Toft.ca!
Watch Nathan Toft’s excellent video to see how he adds students to blogs and assigns them categories!
Here is more information on:
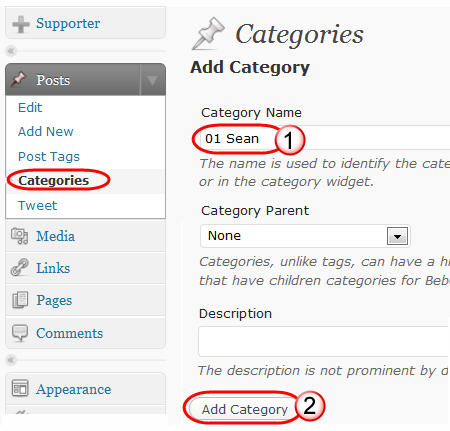
Before you get them writing posts just create a category for each student as follows:
1. Go to Posts > Categories in your blog dashboard
2. Add the first name of your student (if necessary include initial of last name)
3. Click Add Category
Please note:
- Categories won’t display in your category widget until it has been assigned to a post.
About Category Parents
You use Category Parents if you want to sort your categories into groups.
For example, you might have Student as a parent category and then all Student names underneath. Then you might have another parent category for subjects and have all the subject names underneath.
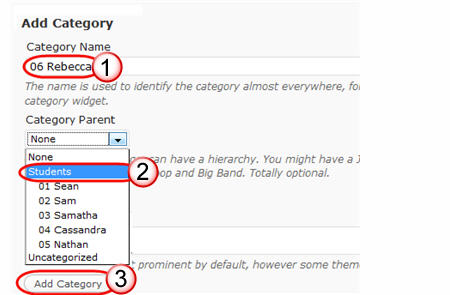
Here’s how you organise categories using Parent Categories:
1. Go to Posts > Categories in your blog dashboard
2. Add the name of the Parent Category e.g. Students
3. Click Add Category
4. Now add a new category for your student by adding the first name of your student
5. Select the desired Category Parent (e.g. Student) from the drop down menu and click Add Category.
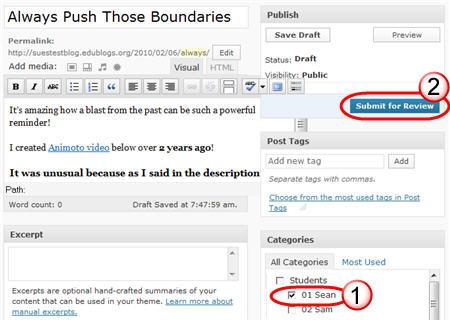
Adding a category to a Post
Now when your students write their post it’s as simple as:
- Write their post
- Select their name as a category
- Click Publish post or Submit for Review
FINAL THOUGHTS
These steps were created as part of the preparation for the Student Blogging Challenge — the next challenge starts September, 2010.
You can read more about the Student blogging challenge here:
And here’s where you find the other steps for setting up your class blog:
- Step 1 – Set up your class blog
- Step 2 – Set Up Your Blogging Rules and Guidelines
- Step 3 – Teaching Commenting Skills and Etiquette – Guest post by Kathleen McGeady
- Step 4 – Help Parents Connect With Your Class Blog
- Step 5 – Add Students To Your Class Blog So They Can Write Posts
- Step 6 – Add A Visitor Tracking Widget To Your Blog Sidebar
- Step 7 – Setting Up Student blogs
- Step 8 – Add your student blogs to your blogroll
- Step 9 – Add Your Student Blogs To A Folder In Google Reader
Please a comment on this post if you need help setting up your class blog just — I’m always happy to help!
If you are enjoying reading this blog, please consider ![]() Subscribing For Free!
Subscribing For Free!


please send alerts
provide job alerts for ECM(electronics and computers engg.)students
Hello! 😀
how to add them blog from them host
You can find a detailed description about how to add student or authors to a blog.
http://www.bloggingxray.com/2012/02/add-multiple-authors-in-blogger.html