Many online tools provide embed code that you can use to embed them into other web sites. The good news is that Edublogs allows you to add almost any embed code into blog posts, pages and text widgets.
This means there are lots of online tools that you can embed to really spice up your posts — providing more variety for your readers and engaging your students!
Let me show you how easy it is to set up a Wallwisher and add it to a blog post.
About Wallwishers
Wallwisher is an online notice board creator.
It’s a really fast and easy way to create engaging activities to use with students.
It’s as simple as:
- Create your Wallwisher
- Add some sticky notes
- Embed into your Blog Post
- Add more sticky notes
The sticky notes can be as simple as text only OR very creative with images, audio, video, SlideShares, Google Presentations, blog posts (basically almost anything you can link to via their URL)!
And students don’t need to have a Wallwishers account to use it!
Here’s examples how you can use with students:
- Frieda Foxworth’s Wallwisher’s in the classroom – includes a great ‘How to’ Wallwisher video
- Ann Leaness’s Wallwisher and Stupeflix in the Classroom – make sure you check out the video at the end to see how she uses a Wallwisher to gather images to create a video with Stupeflix
- Tom Barrett’s 19 Interesting ways to use Wallwisher in the Classroom
- The Conch’s online “post-it parking lot” for pop culture points. Students earn extra credit when they make connections to what they are learning in class. Click on each post title to check out their different wallwishers.
Below is a Wallwisher I’ve created:
I’ve set up this Wallwisher as a sandpit site.
Click on ‘Post a Sticky’ to add your own notes to the wall — why not add your thoughts on how it could be used or share links to your Wallwisher!
How To Create a Wallwisher
1. Go to Wallwisher and click on ‘Build a wall‘
2. Select your Wallwisher image, add your title and your subtitle
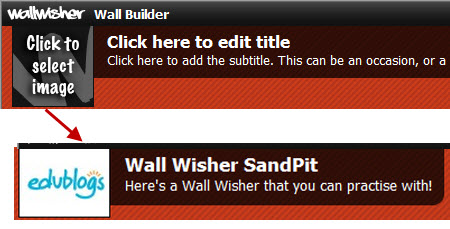
2. Add your name and email address
3. Choose your Wall URL, who can view, who can post sticky notes and decide if you want to approve every post before it is added to the wall.
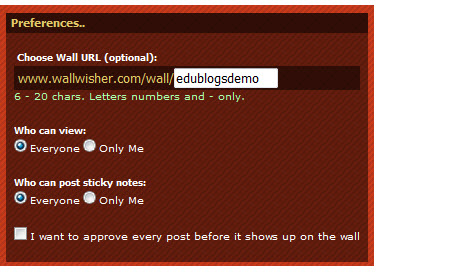
4. Select your preferred theme and click Done.
5. Presto! Your Wallwisher is created and you can now start addding some sticky notes.
Adding and Viewing Sticky Notes on Wallwisher
1. You just double click any where on the Wallwisher to add a new sticky note
2. When the sticky note opens up add your text and/or the URL location of any images, audio, video, SlideShares, Google Presentations, blog posts etc you would like to include in your sticky note and then click OK

Tips:
1. To locate the URL of an image just right click on the image and select:
- ‘Copy Image location’ when using FireFox
- Properties and then copy the Address (URL) when using Internet Explorer
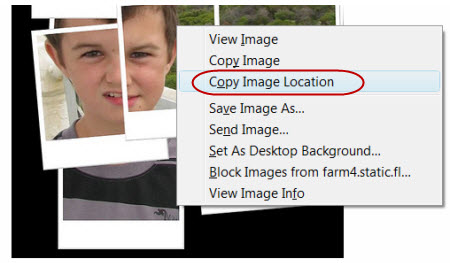
2. When viewing a sticky note with an image embedded – click on ZOOM if you want to enlarge the image
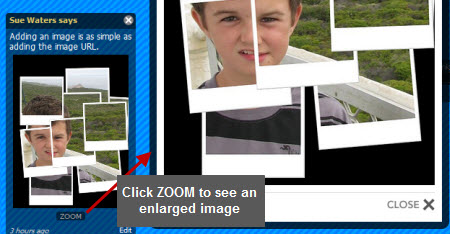
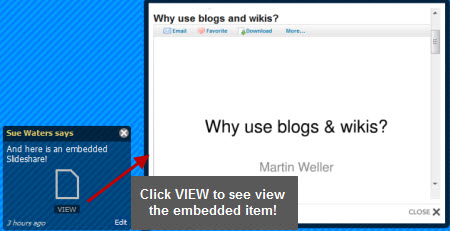
3. When you link to the URL location of audio, SlideShares, Google Presentations, blog posts etc it shows that link using a View icon. Clicking on VIEW opens up the item on your Wallwisher.
Embedding a Wallwisher in a blog post
Edublogs and Edublogs Campus blogs have been customised so that users can embed almost any HTML code into posts and text widgets.
This means most javascript, iframes and object code can be added e.g. videos, google calendars, vokis, Voicethreads, ebooks, widgets
To add any type of object that uses HTML embed code into a post it is as simple as:
- Grab the HTML embed code
- Click on the HTML tab
- Paste the HTML embed code
- Click Publish
Embedding a Wallwisher is the same as any other embed HTML code:
1. Completely write your post including adding title, text, images, tags and categories.
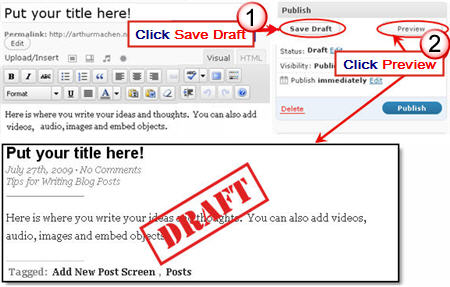
2. Click on Save Draft, previewed your post and make all necessary edits.
3. On your Wallwisher go to Do More and select Embed.

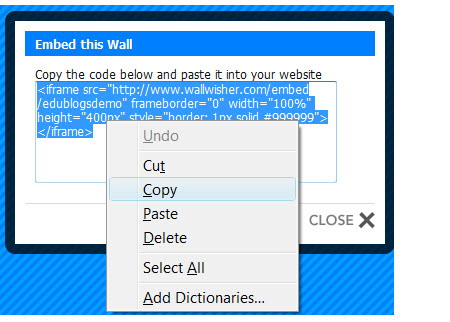
4. Copy the embed code
5. Click on HTML Tab on your blog post.
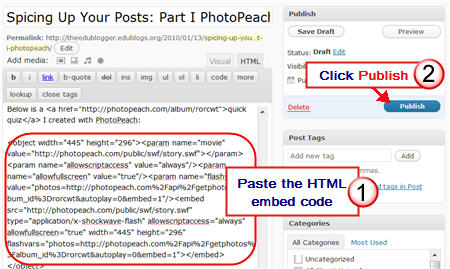
6. Paste the embed code for your Wallwisher into your post where you want it to appear then immediately click Publish
- Don’t click back to Visual Tab before hitting Publish as it can break the embed code.
Immediately close your post once you’ve published. - Change back to Visual Editing mode when you write your next post by clicking on the Visual tab.
Presto! Your Wallwisher is embedded in your blog post and others can view and/or add to it!
If you are enjoying reading this blog, please consider ![]() Subscribing For Free!
Subscribing For Free!

I have figured out how to embed the wallwisher (padlet walls) onto my blog but is there a way that I can control who can leave posts. I clicked on my student’s wall and it allowed me to have access to her information. I am wondering if there is a way around this. I have it on my blog at ewaugh.edublogs.org under the category padlet walls. THanks for your help.
Hi Sue,
I have just discovered Wallwisher and have been trying to set one up for my senior Biology class. So far, so good but I am having trouble inserting videos. I have tried copying the url from a you-tube video into a post. It recognises it as a video but nothing happens when I try and open it in the site, just a blank screen.
Any ideas???
Thanks
Jared
Hi Jared, maybe it was a temporary problem with WallWishers? I just added a video to this Wallwisher and it worked – http://www.wallwisher.com/wall/edublogsdemo
I just love wallwisher, and you have got me inspired again. I will do it for my classes next week i think, intro plan course, learning strategies, brainstorm- great stuff Sue, thanks.
Jane
http://plungingindeep.blogspot.com/
and one from 2010 at:
http://2ycroydon.edublogs.org/2010/11/22/web-2-tools-in-our-blog/
Hi Sue,
Thank you for the information and for always being so prompt. I am also thankful for the extra features on my blog:)
Take care, Lisa D
@Lisa D Ability to embed code on Free blogs was changed several months ago due to abuse by sploggers. Any code you embedded into a post or page prior to the date we had to make the changes will work on a free blog unless you go into that post and edit it.
In your case your blog has had extra features enable by a Pro blog which is why you are able to embed.
To be able to embed we have had to link this ability to Edublogs Pro blog. All you need to do is make one blog an Edublogs Pro blog by following these instructions – http://help.edublogs.org/2009/09/10/how-to-purchase-a-single-edublogs-pro-subscription/
Once you have upgraded the one blog you will be able to enable embedding on up to 50 other blogs by going to your Pro tab > Upgrade up to 50 student blogs.
Hi Susan,
I am a colleague of Josh’s and recommended edublogs.
We set it up together and I tried to embed the same widgets and in particular wallwisher, feedjit, youtube on his blog that function on my edublog, theconch.edublogs.org. Is this a specific problem for new free accounts? I, too, have recently lost screencast embeds from screentoast that were on my blogging guidelines page. Recently, I embedded another wallwisher onto my free edublog and it is active and visible. I lost access to all of my pages last night and saw on FB that it was a glitch that was fixed. By the way, we introduced our blogs to our parents at back to school night this past week. Many had wonderful feedback. Thanks again Susan for all of your help.
Lisa D
@zagorskij Spammers, who create lots of blogs to promote products, were using the JavaScript for redirects on free blogs. ‘No’ other blog hosts powered by WordPress allows embedding like we have done so far and we’ve been forced to limit it due to this abuse by spammers. This is why your embeds are no longer working.
The key is we still want our users to have this ability but we had to provide it in such a way that the sploggers can’t use it.
The only solution was to link it to Edublogs Pro and Campus like we had to do with XML-RPC.
So what we have done is an Edublogs Pro is automatically able to embed all code including Voicethreads, Teachertube and is able to upgrade up to 50 blogs other blogs so that the 50 other blogs can also embed code, access premium themes and their ads are disabled.
You can read more about it here – http://help.edublogs.org/2009/09/01/difference-between-free-supporter-and-campus-blogs/
Hi Susan,
I’ve attempted to embed wallwisher on my blog several times in the html section. Each time in preview it doesn’t show up and the code is missing when I return to the dashboard. Please help. Thank you!
@csizemore75, I have multiple “walls” from wallwisher on my class blog and haven’t had an issue with inappropriate comments. Fortunately, wallwisher allows you to “moderate” all comments before they are posted. Although I do moderate comments for my 8th grade classes, my students seem to appreciate seeing their comments posted immediately and most will alert me if they’ve made a post so that I may approve their comment.
This summer, I’ve used wallwisher during classes as a warm up or closure activity and those comments do not need to be moderated since I am present. If you have time stop by my blog and type wallwisher into the search bar to see how I use it with my students: theconch.edublogs.org
I’ve seen wallwisher and think I’d love to use it my classroom. I’m wondering if anyone has had issues with students adding inappropriate comments and if so, how they dealt with such comments. Thanks!
Can’t get Wallwisher to embed into Google site. Anyone know why?
Thanks for the information, I have embedded wallwishers before so I almost didn’t read the post… thankfully I did.
I didn’t know you could get the url location of an image by ‘copying image location’- how simple… will definitely try next time!
Always learning… thanks
@djainslie, I was totally excited writing that post as I didn’t realise when I started how much you could add to a Wallwisher — so I enjoyed learning it too!
Thanks for a great post. I used Wallwisher this year but in a limited capacity. I never really investigated all the great ways to use it. I will be adding Wallwisher to my list of resources that my students can use to produce content. I am trying to implement a real technology plan that will allow me to go paperless in my classes next year. Wallwisher is a great one to add. I really want my students to absorb the content and produce their own content in a way that is meaningful to them. I, of course, want our activities to be “all about the teach, not the tech.” Thanks to your blog and others, I really feel that we are on our way to some wonderful learning opportunities and collaboration. I am excited for the students.
@Shelly Hugghins, Thanks Shelly. I hadn’t realised the full extent of how you could use Wallwisher so was very excited when I was writing the post to learn the different ways.
I’ve added a link to your PhotoPeach post on the WallWisher to show it off.
@Sue Waters, Thanks for adding a link to my PhotoPeach. I am working to build up my PLN for the benefit of my students. I am also trying to get to a point of student-centered content creation rather than teacher-delivered boredom. Thanks for helping my students and me take a step forward with all your great work.
I use wallwisher as an online “post-it parking lot” for pop culture points. My students earn extra credit when they make connections to what we are learning in class. I have several on my blog – 1 for each unit we study. It’s also a great way for students who normally don’t participate in class to share their learning. Additionally, it gives students another forum for studying and review of material. Please visit our wallwisher on the American Revolution and pop culture points ad please feel free to leave a comment letting us know what you think:
http://theconch.edublogs.org/2010/04/14/pop-culture-revolution-the-new-nation/#more-204
@msdigangi, I like how you are using your Wallwishers. They are excellent!
Is there any chance I can convince you to use Quick Edit to add a tag like Wallwisher to the posts so I could add a link to all your Wallwisher in this post so others can check them all out easily?
@Sue Waters,
Thank you! Yes, I added the “wallwisher” tags to each of my posts. We would love to have visitors!
@msdigangi, thanks and I’ve added a link to your posts under examples of how being used.
Can you check the information is correct?