The most common questions we’re asked are how to use one blog with multiple classes or subjects; or how do I send posts to multiple pages on my blog.
The good news is it is really easy once you know how!
Here’s how it works!
All you need to do is assign different categories to posts, such as assignment, discussion and dates, and then use a custom menu to create links to each post category in the top navigation of your blog.
This is ideal if you want to put up a post or question geared only towards one group of your students. They will see a link for their class in the top menu navigation of your blog, and once they click on that link, they will see only posts meant for them, with the most recent at the top.

You can see it in action on CES Music Blog. If you hover your mouse over Music Classes it displays links to the different Grades and all you need to do is click on a Grade to view all posts published for that grade. For example, here are all the posts for Grade 5.
Here’s the step by step instructions for setting it up on your blog!
Don’t let the length of the instructions fool you – it really is easy to setup, and once it is done, it will last you all school year 🙂
Step 1: Publish a new post for each subject area or class
The first step is you need to publish a new post for each subject area or class with the category assigned for that subject area or class.
Here’s how you do it:
1. Go to Posts > Add New.

2. Add your title and post content.

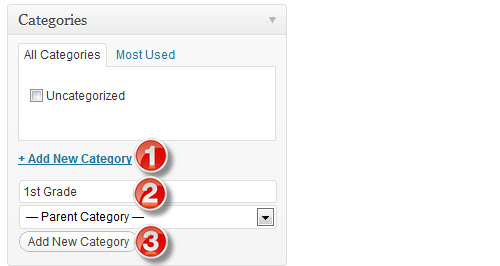
3. Click on Add New Category, type your new category name and then click on Add New Category.
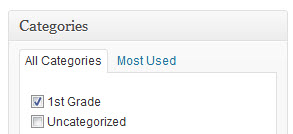
Here’s what it should look like when the category is assigned to the post:
4. Now click Publish.
Repeat the process to publish a new post for every subject or class. As you’re publishing the posts you’ll see them posted on your homepage. Don’t worry about this! We’ll show you how you can change this is step 3!
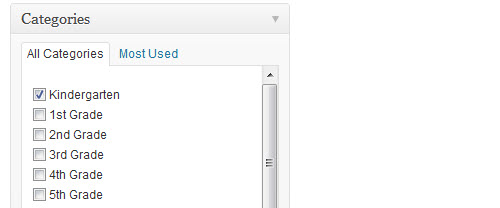
Here’s what your categories might look like when you are finished publishing all the posts!
Tips:
- If you want to use the same discussion question and have each class respond with comments for just their class then you need to write one post for each class and only assign one category to that post (i.e. their class category).
- If you are writing a general news post that applies to all subjects, or classes, and don’t want each class to respond with comments just for their class, you can assign the one post all categories.
Step 2: Create your custom menu
The next step is you need to set up your custom menu by following these instructions:
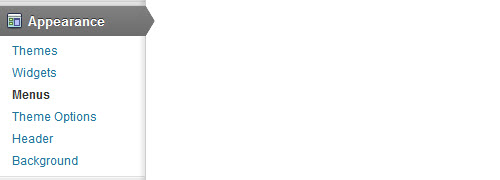
1. Go to Appearance > Menus
2. Give your menu a name – ‘Main’ will work great!
3. Click on the ‘Create Menu‘

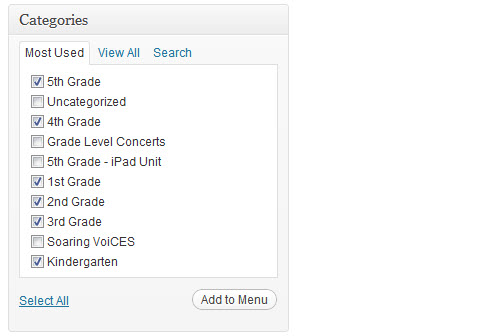
4. Select your categories you want to add to your menu then click Add to Menu.
5. Now select the pages you want to add to your menu then click Add To Menu.

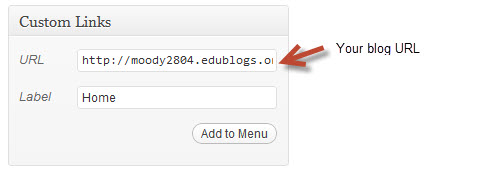
6. Create a custom link for home by adding your blog URL, the name Home and click Add To Menu.
- When readers click on the Home link they will be taken to your front page.
- For example the blog URL of this blog is http://theedublogger.com/
- You can use custom links to link to any website — which is really handy!
7. Now drag/drop the menu items to change their order in your menu.

Any menu item that is indented will appear as a nested page under tab.
Here’s what my menu now looks like:

8. Once you’ve finished changing the order click Save Menu.

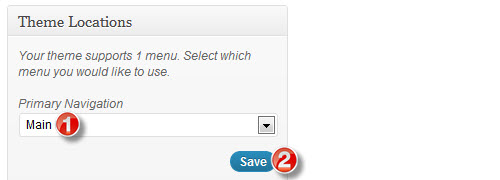
9. Now to display your new top navigation on your blog you just need to select Main from under the Primary Navigation drop down menu and then click Save.
Cool tip:
You can create static level tabs using a custom link if you just want a link name that doesn’t go to a page that exists.
For example, if you click on About in the top menu of this blog you’ll see it is a static level tab used just as a placeholder for page links we’ve added underneath it.

Step 3 – Choose what should be shown on your “home page”
By default, your home page is your blog post page however you can change this so your homepage is a static front page and your posts are sent to a different page on your blog.
Because you’ve assigned categories to certain classes or subjects. you may not want all posts to show on your home page.
If you are ok with all posts, no matter the subject or class, showing together on your home page, then you’re finished and your class blog is all set up.
However, if don’t want all posts displaying on your homepage then you’ll need to create a static home page.
Here’s how we are going to do it:
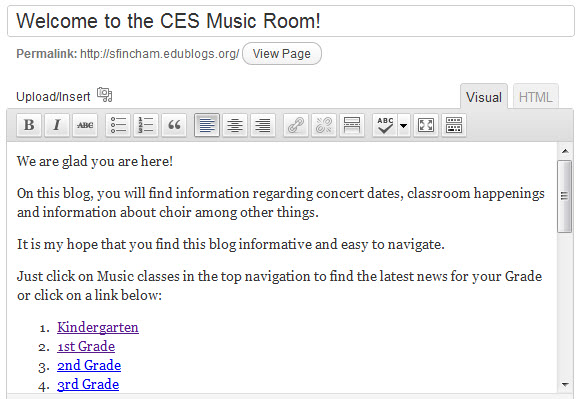
- Publish a page that has information you want people to see when they first visit your blog.
- Make your front page display a Static page.
Here’s the step for you to follow:
1. Go to Pages > Add New.

2. Now just give your page a title, add your content and click Publish.
3. Go to Settings > Reading

4. Choose ‘Static Page‘ and in the drop down, select the new welcome page you just created.

5. Click ‘Save Changes‘.
You will be able to go back and update this page with new announcements whenever you like – but users that have subscribed to your blog feed or by email, won’t receive any sort of notification.
You can also create a new blank page called something like “All Posts”, and choose it under the posts dropdown box so that there will be a place for all posts to be shown on your blog in one place.
Going from here…
If you have this up and working and would like to share, feel free to leave a comment below letting us know!
For more information on setting up a class blog, check out the ongoing Class Blog series on our Teacher Challenges free professional development blog.
Thank you so much for this article! I’m a new blogger & have spent weeks trying to set up my blog in this manner, but was unable to find any easy to follow instructions. I was starting to think it would be impossible to do what I wanted. This made things crystal clear 🙂 Much appreciated!!
I have set up categories and the menus as well as the welcome page. I am very pleased with my effort although the blog posts are minimal. I don’t know how to create a link to the items in the welcome page so that children, etc can click on the link and go to the page. Help with this please.
Hello Cheryl. You might find this post helpful in creating links within a post. I can’t find your blog by doing a search of your name so I can’t look at it to see what you want to do exactly. If you would like to see the code I used to write that link above, you can learn more here. Following Edublogs tutorials has made all the difference in my blogging and I can apply what I learn here to others areas later on when I come across a new challenge.
THANK YOU SO MUCH! This help page has been so helpful. It is a complicated process to set it up but well worth the effort for a clean, well organised blog 🙂 happy days. Thank you
Does anyone have any suggestions for themes to make my classroom site. I like the Classic Theme because I can upload pictures on the header that my students will recognize.
But I need one where I can have a different “page” (is this what I want) for each class. I want it so each class can be a a different stream of posts. I teacher 3 algebra classes and 2 physical science classes. Ideally I would like a different blog stream for each class and have my home page as general updates and announcements.
Hi Stephen,
Custom navigation menus with drop down menus will work on all Edublogs themes and almost all Edublogs themes support the ability to upload your own custom image header.
However, as you also want to have updates I would set up the Updates (or News) as a separate menu item using a category and make your homeapage a Static homepage. Otherwise all the posts will appear on the homepage which may end up confusing your students.
Please let us know if you need our help setting it up.
Does anyone have any suggestions for a clean theme where the mutliple menus will work. I am using the classic one but that does not work with this.
Okay, I did that! It took me longer than it should have because I couldn’t believe I was going to be stuck in my theme with such an ugly random-looking Main Menu. It’s enough to make me change themes! Thank you for an excellent tutorial!
Sandy
thank for posting this 🙂
I’m sorry but, I STILL don’t get it.
After reading all of these helpful hints on educational blogs, I feel empowered to create my own.
Thanks for the times, will implement this asap 🙂
As for me it’s becoming really simplier to understand!
I have a different version of the problem. My school has Edublogs campus, so each of my students has an individual blog. If I make them all use the same category (or tag), is it possible to have an RSS feed that would show all the posts from the domain having that category?
Hi Rafael,
There isn’t currently a good way to do that, but sounds like a great idea!
Hi Rafael and Ronnie, I’m a bit behind in reading these comments.
But we can provide an RSS for a tag or category across an Edublogs Campus site.
Sorry Ronnie and totally my fault for not mentioning that we can do it.
Rafael – Can you tell us which Edublogs Campus site you are using so I can follow this up for you.
The most important thing about blogging is to be organized. This is going to help your reader to find what topic they are interested in easily. Besides, it will make it easier for your reader to know what topics tackled in your blog.
Thank you for showing us how to do this. 🙂
Interesting that this post should arrive soon after I needed to make changes on my own blog. My problem was the things in my header were covering the title so they needed to be reorganized and you directed me to creating custom menus. That was helpful.
I think that over time our blogs become much like closets. We collect things, add more all the time, and have trouble tossing things out. That’s where I am now. I think I need lots of sidebar space so I keep the three closets, er… columns, to hold everything but even I can be overwhelmed by the visual challenge of this many options on the screen.
Thanks for yet another cool blogging lesson.