
I’m not the most dedicated Instagrammer (need to get out more) or the best photographer (wish I was) but like many other educators, I enjoy sharing my photos on Instagram.
Why? It’s fun! Easy! I can quickly share photos taken on my iPhone when I’m out and about! Or have fun editing photos and sharing from my camera on my iPad! And in the process I’m learning more about photography, photo editing and other Instagram users.
Here’s my advice to help you get started or get more out of using Instagram.
Click on a link below to quickly go to the section you want to read:
- What is Instagram?
- Creating an Instagram account
- Setting up your profile information
- How to follow other instagram users
- Overview of smartphone and tablet camera specs
- Sharing photos saved on your device to Instagram
- Introduction to Instagram filters, borders and effects
- Overview of the Instagram filters
- Working with borders
- Working with lux
- Using tilt shift
- Sharing a photo taken from inside Instagram
- Introduction to captions, hashtags and sharing
- Using hashtags on Instagram
- Sharing your photos to other services
- Viewing photos posted on Instagram on your computer
- Other Photo apps and Instagram
What is Instagram?
Launched in 2010, Instagram is one of the fastest growing mobile media phenoms; with just over 15 million users at the start of 2012 it now has over 50 million users.
Instagram is a free photo sharing app for android and iOS devices that lets users take a photo, apply photo filters and share through a variety of social networking services including Twitter, Facebook, Flickr and on Instagram.
Instagram is sort of like Twitter – except instead of connecting with others using 140 characters or less, you’re sharing photos.
Instagram is popular because:
- It makes sharing photos using mobile devices quick, easy and a lot of fun!
- It provides a great place to learn more about each other and photography.
- The Instagram interface is similar to other popular social networks and includes features to easily connect with others such as following users, like other users’ photos, commenting.
Creating an Instagram Account
Signing up for an Instagram account is as simple as:
- Download the Instagram app in the App store on your iPhone, iPod or iPad or in Google Play on your Android device.
- Open up Instagram on your device.
- Tap on the ‘Sign up‘ button to create your account. ( You must sign up for an account using the Instagram app on your device; it isn’t possible to sign up using the Instagram website.)
- Now just add your email address, username, password, upload your profile picture and click Done.
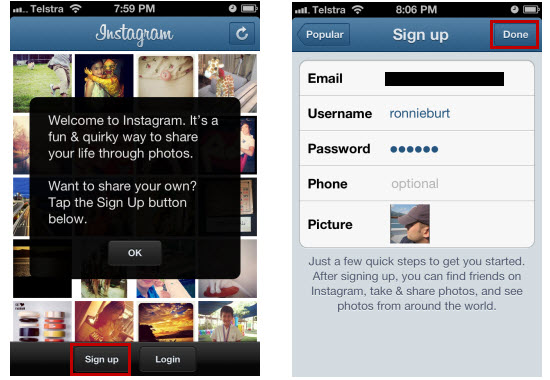
Tips for creating your account:
- Remember first impressions count! Choose your username and profile picture carefully.
- Choose a username that makes it easier for others to relate to you as a real person and conveys the right impression of who you are. e.g. Compare rwb3 with ronnieburt — which is easier?
- But don’t stress too much — your username and picture can be changed any time (Profile > Edit Profile)
- While you can find friends to follow during the sign up process it is worth bypassing this step, by tapping on Next on the Find Friends screen, to complete your profile information and sharing a few photos before finding friends to add. Some educators check this information to decide whether to follow you.

Here’s a quick overview of the main tabs inside Instagram to get you started:
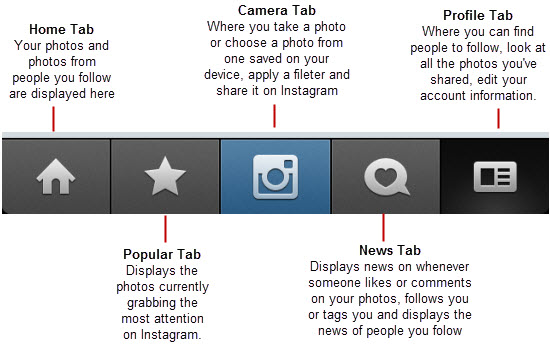
Back to Top
Now just complete your profile information as follows:
- Tap on the Profile tab and then tap on ‘Edit Profile‘.
- Add your First name, Last name, blog or website URL (if applicable) and your bio then click Submit.
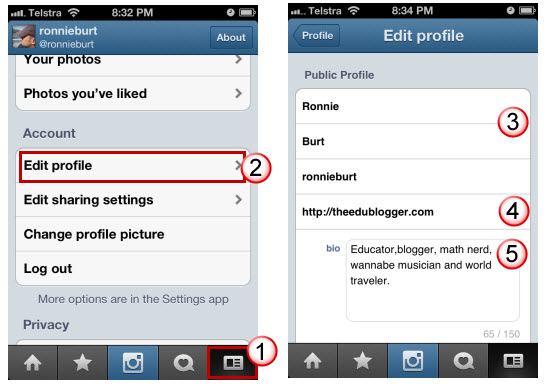
Below is an example of profile information on a User’s public profile page:
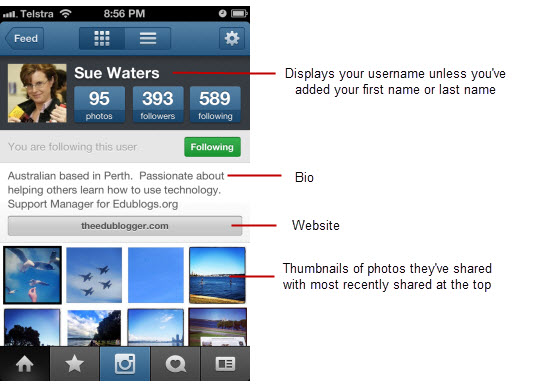
Back to Top
Following Other Instagram Users
A key aspect of using Instagram is connecting with other users. So once you’ve shared a couple of photos it’s time to start following other users.
Finding people to follow is as simple as:
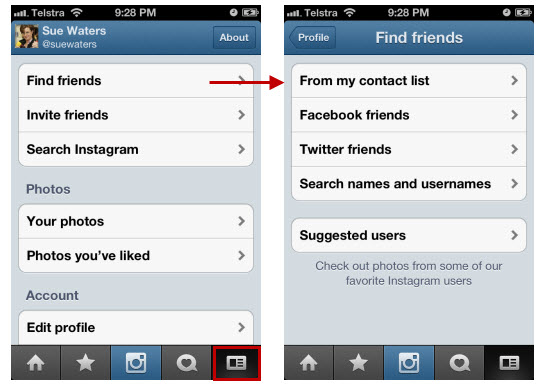
- Tap on the Profile tab.
- Now tap on ‘Find Friends‘ and use any of the options to find users you want to follow.
Sharing Photos on Instagram
To share photos on Instagram you can either:
- Take a new photo from inside Instagram.
- Choose from a photos saved on your device.
But before sharing photos it’s worth first discussing Smartphone and tablet cameras because the quality the photos you take depend on the device you’re using.
Smartphone and tablet camera specs
 Cameras on mobile devices have improved considerably. While the megapixels on these devices fall short of what’s available in today’s point-and-shoot digitial cameras, many of them are capable of producing good images.
Smartphones are now the camera of choice by many people; iPhone are the most popular device for uploading photos to Flickr and whole communities have formed for iphoneography (iPhone and iPad photography enthusiasts).
Why are Smartphone cameras popular? It’s always with you!. See something interesting and you can take a quick photo. And better of all with photo apps you can quickly enhance and manipulate photos in ways you once dreamed of!
The camera specs for most of the latest smartphones are fairly similar; many are now 8 megapixels with HD video capture.
Below’s a comparison of iPhone cameras:

Whereas the cameras in tablets, such as iPads, and devices like iPod Touch’s aren’t as powerful and their photos aren’t as good as those by smartphones like the iPhone 4S.

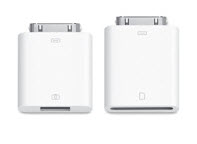 However, another option is to use photos taken with your digital camera. Importing photos from a digital camera using an iPad is as simple as inserting your memory card in the iPad Camera Connection kit and connecting it to your iPad.
Ultimately, to some extent, it really depends on how you want to use the photos you take. Higher resolution photos are ideal for printing whereas a lower resolution photo is fine if you just want to share online.
One of my favorite photos I’ve shared on Instagram was taken with my old iPhone 3; it’s quality isn’t as good as a photo taken on my iPhone 4S but it tells a story and captured a sense of that moment in time.
Back to Top
Sharing photos saved on your device to Instagram
When saving photos on your device it is important to realise that Instagram photos are designed in the shape of the old polaroid picture so you need to keep in mind that your picture will be cropped as a square i.e. avoid making the entire image you want to share fill your camera screen when saving photos to your device.
Sharing a photo saved on your device using instagam is simple:
1. Just tap on the “Camera/Share” button.
![]()
2. Tap on the Image Icon
![]()
3. Choose a photo from your photo library,
4. Position the photo within the square crop box — you can use a pinching motion to zoom in and out of the photo.
5. Then tap Choose.
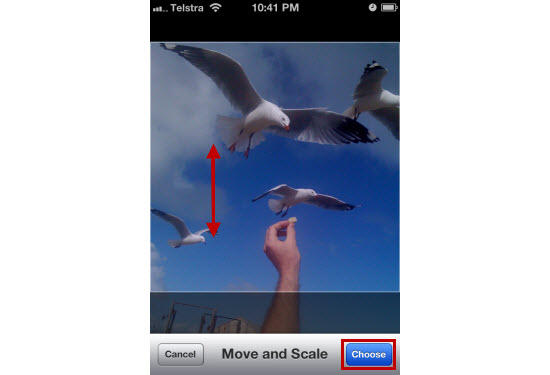
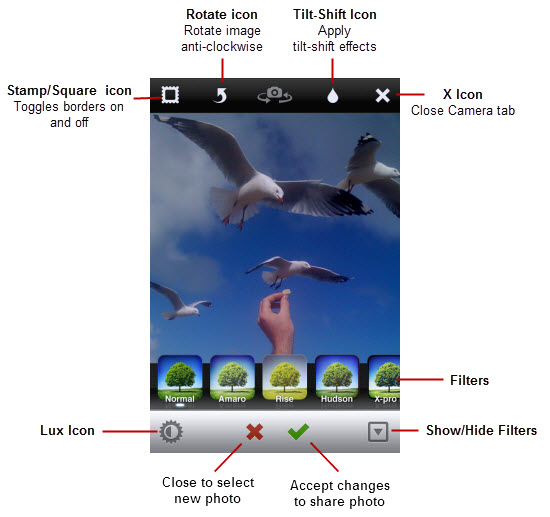
6. Choose your effects (lux and tilt shift), filter, if you want to show/hide border and, if satisfied with your image, tap on the green check mark to continue to add caption, location and share.
Introduction to Instagram Filters, borders and effects
The cool part of Instagram is you can apply filters, effects and borders inside Instagram before sharing the photo.
Here’s a quick overview of the different options and what they do:
Back to Top
Filters
Filters are ready-made effects for your photos. Using filters, you don’t have to make separate adjustments for color, saturation or other image characteristics to achieve a particular look because the filter does it for you.
Just choose a filter and your image is transformed into a different look and feel; they can soften imperfections, draw lights and colors in interesting ways.
Instagram comes with 17 filters you can use. Which filter works best depends on the light, the content on your photo and what you’re trying to achieve. The best option is to try each filter on your photo to see what creates the look you want.
Here’s an overview of the Instagram filters:
- Normal: This is no filter; it’s what your photo looks like before a filter has been added.
- Amaro: Adds a country or old west feel to your photo.
- Rise: Used when you want soft to warm light to leak and is great for landscape and nature shots.
- Hudson: Creates subtle vignette like feel with cool blue tones.
- X-Pro II: Brings out the warm, saturated tones with an emphasis on aquas and green.
- Sierra: Warm and a little faded. A bit like a less intense version of Valencia.
- Lo-fi: Creates a dreamy, slightly blurry look with saturated yellows and greens.
- Early Bird: Creates a faded, blurred colors, with emphasis on yellow and beige.
- Sutro: Gives a sepia like feel with emphais on purples and browns.
- Toaster: Adds high exposure to your photo with corner vignetting.
- Brannan: Creates a low-key image with emphasis on greys and greens.
- Inkwell: Creates a black and white image for that old photo look.
- Walden: Gives your photo a washed out color with bluish overtones.
- Hefe: Makes your photo fuzzy with an emphasis on yellow and golden tones.
- Valencia: Creates true-to-life contrast with slightly grey and brown overtones.
- Nashville: Creates sharp images with magneta to purple tints.
- 1977: Gives your photo a 1970’s feel.
- Kevin: Creates a super-saturated retro looking photo.
Here’s a sample image using each of the different filters:


Borders
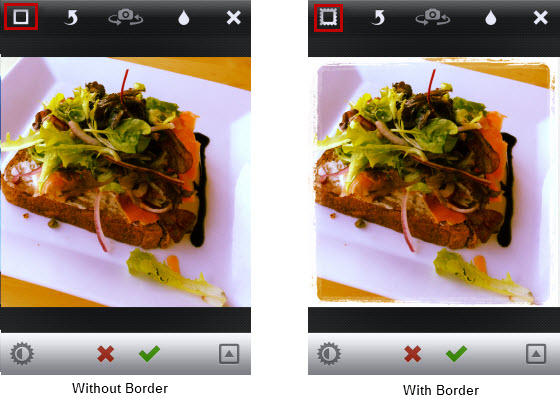
Most Instagram filters include the option to add a standard border to your photo. Filters that don’t include a border option are: Normal, Amaro, Rise and Valencia.
After applying the filter to the photo you just tap on the square in the far upper left hand corner to toggle the border on and off.
Here’s a Lo-fi adjusted image with and without a border:
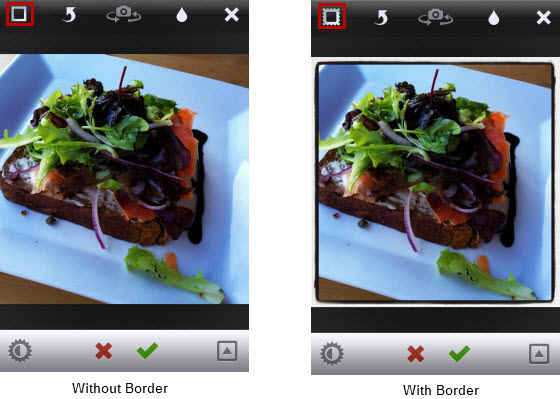
Here’s a Kelvin adjusted image with and without a border:
Lux
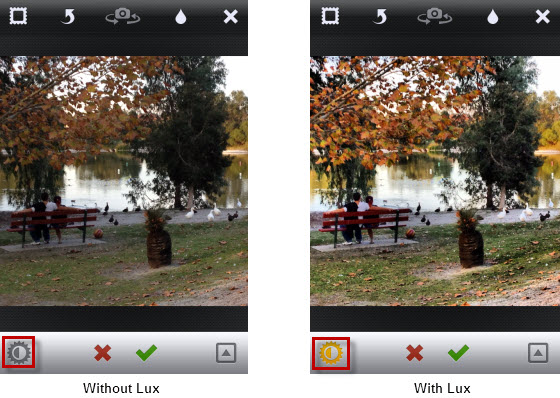
Lux works by making your photos more vibrant and brings out the details in your photos that you might not have noticed. It works by bringing brightness to dark images by filling dark areas with light. It can also more depth depending on which filter you are using.
The lux icon is the Sun icon located on the bottom left hand side corner. This feature is not available on all Android devices.
The best option is to toggle lux on and off with each filter to see if it improves the look of your image.
Tilt Shift
Tilt-shift photography involves altering the depth of field for what you’ve captured allowing you to emphasise certain objects in the photo while blurring the surrounding around your chosen objects.
It is normally done using an actual tilt-shift lens on a camera and can be imitated using Photoshop, or using photo apps like Instagram.
To apply a tilt shift in Instagram you just need to:
1. Select the drop icon (which represents tilt shift) from the top menu.
2. Choose the linear (-) or radial (o) tilt shift.
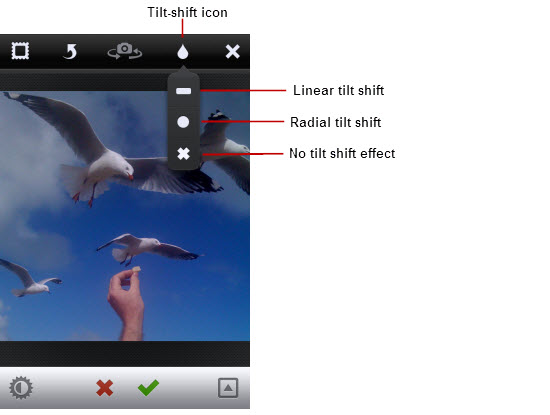
3. Drag or tap the double lines (for a linear tilt shift) or circle (for a radial tilt shift) to the desired section of the photo.
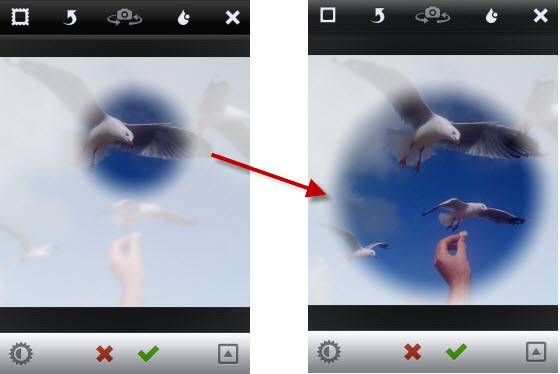
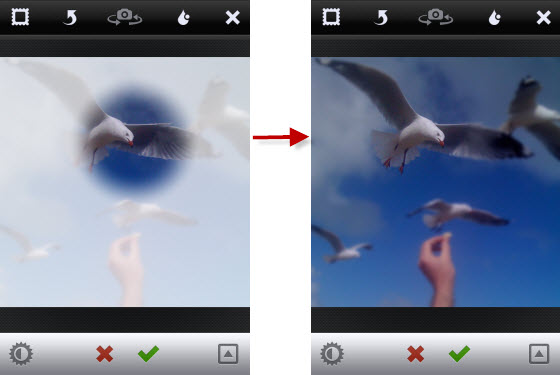
- The translucent white sections will become blurred once you remove your finger from the screen.
- You can use a two finger action to expand or contract the size of the radial tilt shift.
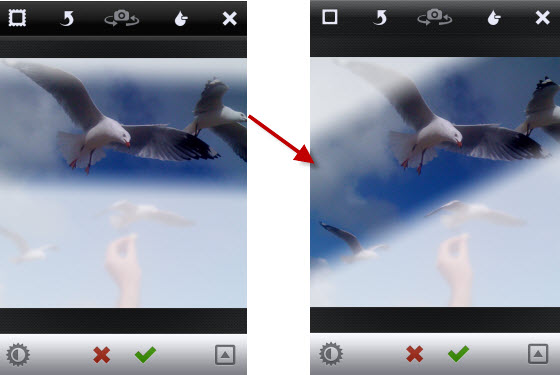
- You can also use a two finger action to expand or rotate the direction of the linear tilt shift.
Here’s an example of a radial tilt shift:
Here’s an example of a linear tilt shift:

Sharing a photo taken from inside Instagram
Taking a photo using instagam is simple:
1. Just tap on the “Camera/Share” button.
![]()
2. You take the photo by tapping on the camera button.
Before taking the photo you can:
- Try each filter to compare how your pjhoto will look with each effect.
- Check what it looks like with radial or linear tilt shift.
- Show or hide border.
- Decide to use or not use flash.
- Change which camera you use i.e. back facing or front facing.
Please note: Filters, borders, tilt shifts and lux can also be adjusted after the photo is taken.
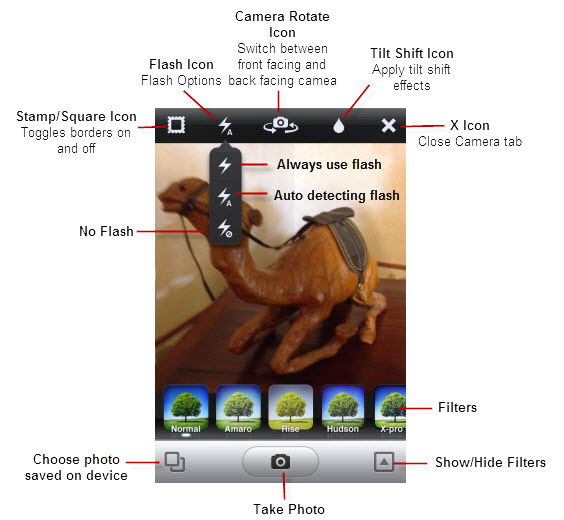
3. Once the photo is taken you can use the arrow to rotate your image, adjust your lux on or off (by tapping on the Sun icon), change filters and border options.
4. If satisfied with your image, tap on the green check mark to continue to add caption, location and share.
Back to Top
Introduction to captions, hashtags and sharing
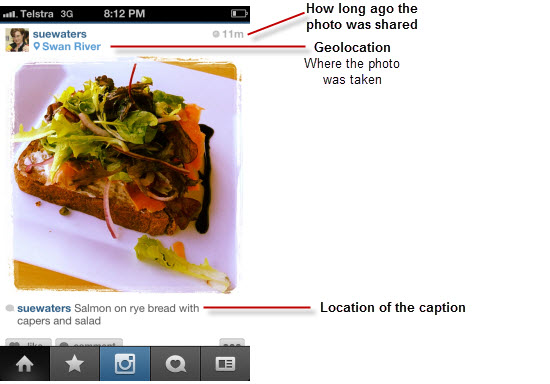
The final step before sharing your photo is adding the caption and your location (optional).
The idea is to make the caption informative or attention grabbing so followers can learn more about your photo if they are interested.
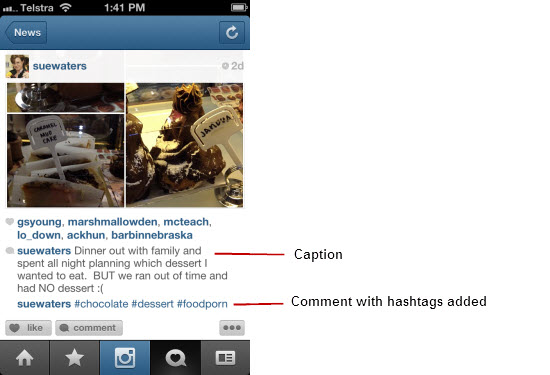
Here’s what photos look like in your Home tab so you can see where the caption appears:
Editing a caption or comment
Don’t stress if you make a mistake. It’s easily fixed.
While you can’t edit a caption or comment; all you need to do is delete it and replace with a new one as follows:
1. Go to your photo.
2. Click on Comment link under photo.
3. Tap on the gear icon on the top right corner of the comments screen.
4. Tap the red ‘Do not Enter’ Button next to the comment you want to delete then tap Delete.
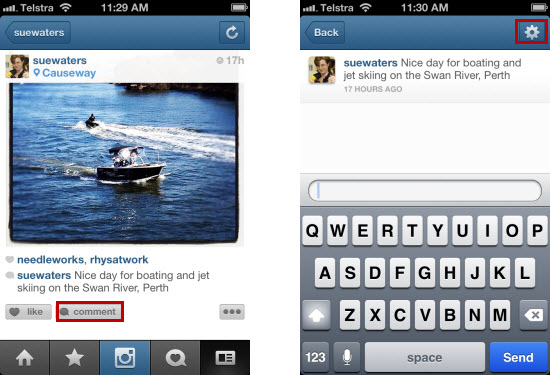
5. Now just write your new caption or comment.
Using hashtags on Instagram
You’ll also notice that some users add hashtags to their captions and comments.
Hashtags work similar to Twitter hashtags. You can add hashtags to any of your own photos by including hashtags in the caption of your photo or in a comment under the photo.
When you click on a hashtag you’ll see all photos tagged with the same hashtag. Here’s an example of all photos tagged #chocolate.
You search hashtags in Instagram by:
1. Going to Your Profile tab.
2. Tap on Search Instagram

3. Tap on Tags and add your search term.
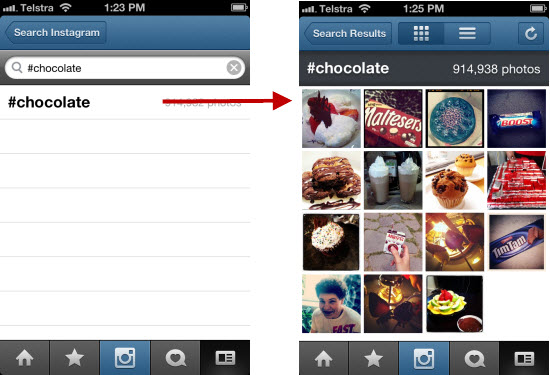
Hashtags help users connect with each other.
Some Instagram users use hashtags for photo contests and groups. For example, a weekly challenge where you submit a photo based on specific subject matter, or where everyone uses a specific photo app, and everyone tags their photo using the same hashtag. These types of activities help you connect with other enthusiasts.
You can check out example of an instagram hashtags here for #bestoftheday. You’ll see other commonly used hashtags in their captions.
Lots of hashtags in captions can be annoying for some users. The solution is simple. Write your caption without your hashtags and then add a comment after you’ve shared your photo to include all the hashtags you wanted to use. Remember to make your hashtags relevant to the picture.
Sharing your photos
Once you’ve added your caption, and decided if you want to enable location, it’s time to share your photo by tapping on Done.
You can share your photo to Twitter, Facebook and all your other social network services when you post to Instagram or share to them after you’ve posted it to Instagram.
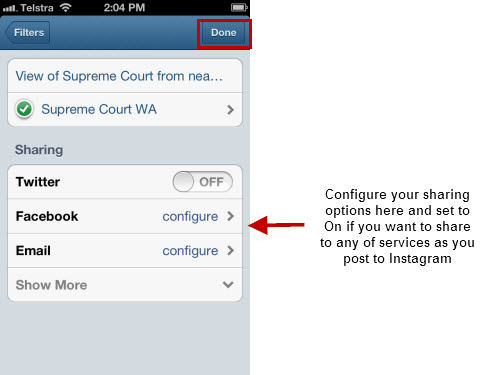
The benefit of sharing to other services later is you can customised the message you want associated with your photo based on where you are sharing.
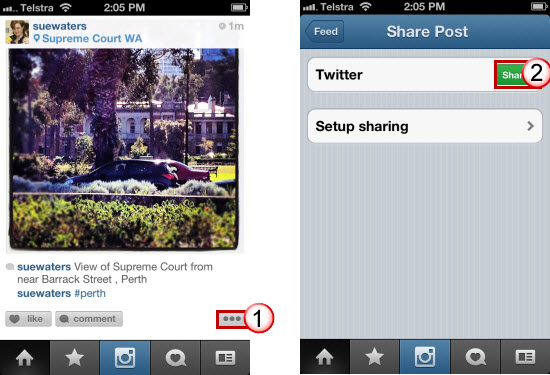
You share photos you’ve already uploaded to Instagram as folllows:
1. Locate your photo.
2. Tap the “….” link at the bottom right of the photo you want to share.
3. Tap on Share post and select the services you want to share to.
- Just tap on Setup Sharing if you haven’t set up your services.
Viewing photos posted on Instagram on your computer
Instagram doesn’t have a web presence for viewing your photos online and instead you use third-party sites like the following to view them:
- Extragram – here’s my photos on Extragram.
- Ink361– here’s my photos on Ink361
- Gramfeed – here’s my photos on Gramfeed
- Statigram – here’s my photos on Statigram.
- Webstagram – here’s my photos on Webstagram
Other Photo apps and Instagram
Once you’ve started using Instagram you’ll notice that some users share some really amazing photos (check out the Popular tab to see what I mean!). And if you’re like me you’ll start wondering how they create these photos.
Besides taking a great photo some users will process their photos through one or more photo apps before sharing their photos on Instagram.
Instead of using the borders, effects and filters in Instagram they’ll use photo apps to achieve the look and appearance they’re trying to achieve then post to Instagram as a finished product.
The most important aspects to be aware of with photo apps are:
- There are lots of different types of photo apps available.
- They vary considerably in quality.
- Photo apps have improved considerably in the past few years in terms of the quality of photos they produce.
Here’s what you need to consider when choosing photo apps:
- Resolution is the key to image clarity.
- Photography apps vary considerably in terms of the resolution they use to save images.
- There are many photography apps that only save images at low resolutions. While other apps give you a choice of which resolution you want to use when saving to camera roll
- Avoid apps that only save low resolution images
- Always work with the maximium resolution setting to ensure best clarity.
- Always adjust your resolution setting when you install a new photography app to the maximum resolution before you start using it — better to do this from the start then to suddenly discover you’ve been saving at the lowest resolution.
- Look for the i, gear icon or words like Settings, options inside the app to check and adjust the resolution.
- One of the reasons why apps process images at lower resolution is it is less taxing on the iPhone’s software and hardware. Lower resolutions allows it to process faster while it’s less likely to crash the app.
- You can find that the best photo app lists are based on what’s popular, or what was the best option when the article was published, as opposed to what is currently produces the best quality image.
Types of Photo Apps
There are so many photo apps it’s impossible to do them justice in this post so we’ve just included a brief overview below of a few of the different types of photo apps to get you started.
Check out the following resources if you would like to learn more about using photo apps:
- Create Great iPhone Photos: Apps, Tips, Tricks, and Effects
- iPhone Obsessed: Photo editing experiments with Apps
- iPhoneography blog
Tip:
- It’s worth cropping your photo into a square before making a lot of changes using a photo app if you are planning on sharing it on Instagram. Making it the same dimension as you share on Instagram helps you focus on the aspects of the photo you want to be enhancing.
- Many photo apps include cropping tools.
Image Editing Apps
Image Editing apps are considered ‘must have apps’ if plan to do any extensive manipulation and altering of your photos.
The best of these apps work like high end desktop image editors such as PhotoShop and include adjusting options such as Curves, Levels, Channel Mixer, Un-Sharp Mask, Sharpen, HSL, White Balance, Shadows & Highlights, Brightness & Contrast, Exposure Adjustment, Noise Reduction, Vibrance as well as FX effects (filters), frames and borders and other tools you’ll find in other photo apps.
My preferred image editing apps are:
PhotoForge2’s online tutorials are a good place to learn the basic of what you can achieve using image editing apps.
Here’s an example of using the history tool on PhotoForge2 to compare effect of changes on the image:

Camera Apps
Camera apps add in tools missing from your device’s built in camera app. Some also include image editing tools for applying filters, frames and making adjustments. Examples of camera apps include: Camera+, ProCamera, Slow Shutter Cam, Night Camera.
Apps for combining photos
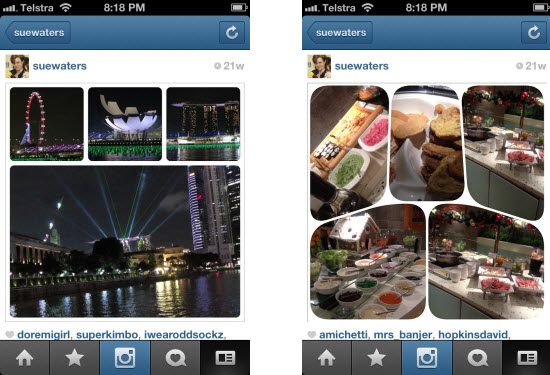
These apps allow you to combine multiple photos into a single image. Examples of these types of apps include: Diptic, Frametastic. PolyMagic.
Panorama Apps
Panorama Apps let you stitch together images right on your camera. Examples of these types of apps include:
- AutoStitch Panorama – assembles photos from your camera roll into a panorama.
- 360 Panorama – turns your iPhone into a full featured 360 degree panoramic camera.
What Do You Think?
Have we missed any important tips, good resources or apps you like to use?
Let us know in the comments below and we will be sure to add it to the post!



Instafusion is a gre8 app to edit photos. i mostly use its blending and masking features….
This is a great tutorial I have had instragram for months and had uploaded one photo until I went through this. You have demystified it for me and I am now posting in instagram and have connected my twitter and facebook accounts as well as Flickr! I am not afraid of instagram anymore! Thank you. 🙂