There are several ways student accounts and blogs can be created on Edublogs. Knowing which to use depends on how hands-on you want to be and what your school’s privacy policies are like.
Here’s our summary of the different options including tips for choosing usernames, passwords and blog URLs.
User Invite Codes (Student Creates)
The first method for creating student accounts is using Invite Codes that allow the students to create their own user accounts, which are then automatically connected to you class blog. This process makes it much easier to add student accounts because you don’t have to create all the student accounts yourself, but you do give up control over usernames, passwords, etc. in the process.
For those of you who are fine with allowing students to set up their own accounts, here are the steps:
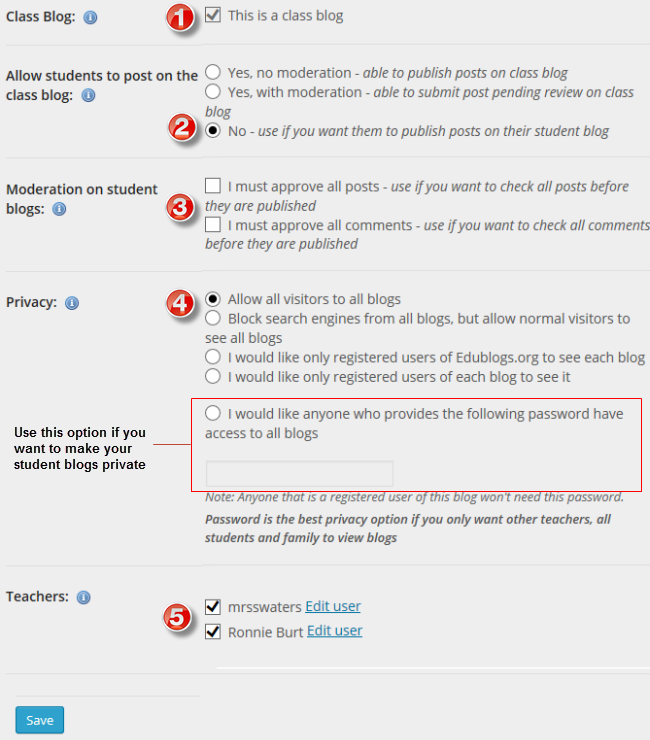
1. First, you want to make sure your blog is set up to be a Class Blog.
Go to My Class > Create a Class, choose the settings you want to use for your class and then save those settings.
After saving the My Class settings, your class is now designated as a Class Blog. For more information, refer to Set up My Class support documentation.

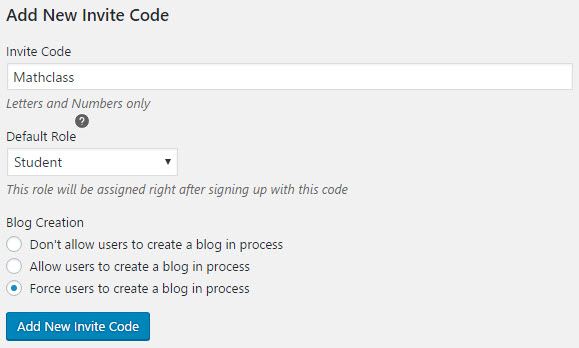
2. Now go to My Class > Invite Students to set up your Invite Code.
Once there, you will enter a name for your invite code. Something simple like “invite1” or “mathclass” will work perfectly.
Leave the default role as Student as this is the user role that My Class uses to control what the student can do on the class blog and on their student blog.
You will then decide whether or not you want to allow your students to create a blog during the signup process. If you only want them to be users on your class blog, then you would not want to allow them to create a blog. If you do want them to have their own student blog connected to your class blog, then the best option is to force them to create a blog.

3. Once you have made your choices, you will click the “Add New Invite Code” button.
The page will then refresh and you will be provided with an Invite Code URL that you can give to your students.

My Class (Teacher Creates)
If you want or need to have control over the usernames and passwords given to your students or if you want to avoid issues with students entering the wrong information during the signup process, then you’ll likely want to set up the accounts for them.
You can add student accounts to your class blog two ways.
First, you can create only user accounts for them using My Class > Create Student Users.
The other option is to create user accounts and blogs for them using My Class > Create Student Blogs.

You first need to set up My Class using My Class > Create Class before you’ll see My Class > Create Student Users or My Class > Create Student Blogs.
Tips For Creating Student User Accounts
Here are some tips for creating strong usernames and avoiding common issues when setting up new accounts.
Make your usernames unique
Edublogs is used by millions of users all over the world. So, the chance usernames like mattyb or jenc being available are pretty low.
There are some patterns that you can use to help create unique usernames that the students will remember. First, you can try using your class name – and maybe period number – in conjunction with their first name and last initial. Something like johnqmathper4, for example.
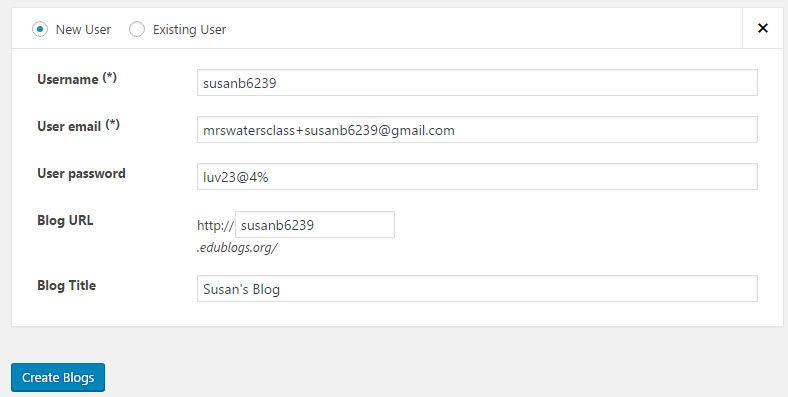
Another good idea is to use their first name and last initial in conjunction with a number. Many schools have ID numbers for the students and they use 3 or 4 of the digits of that number in their daily routine. So a username like susanb6239 will be easy for the student to remember and is likely unique enough not have been used by another Edublogs user.
One thing to stay away from is using the student’s full name in their username, blog URL and blog title. This is not allowed by many schools’ privacy policies and, in general, is good to avoid for privacy and security reasons.
Make their passwords easy to remember
We get emails all year long from student’s who cannot remember their passwords. While we do have a Lost Password link that users can use to get a password reset email sent to them, it is not uncommon for school email filters to block our emails from getting through to student accounts. Other times, the email address may have been entered incorrectly. In either case, the students are unable to reset their passwords and are essentially locked out of their accounts.
The best way to avoid this issue is to use passwords the student will remember. If they already have a password they use to access other programs on campus, then use that one. There is no sense making them remember a new one if they already have one they’ll definitely remember.
If they do not have one they’re already using, then using something like the class name and a unique two or three-digit number might work well — like potterenglish337.
Choosing the best email address
If your students have a school email address, then this is normally the best one to add to their user account.
If they do not have their own email address, then we usually recommend using the Gmail+ method for adding unique email addresses to your student’s user accounts.
Choosing a Blog URL and Title
The simplest option when creating the student blog URLs is to use the same thing you used for their username. If a student’s username is susanb6239, then make her URL susanb6239.edublogs.org. Again, the easier it is to remember, the better.
For blog titles, we recommend using something short and sweet like Susan B’s Blog or Susan’s Portfolio.
Usernames and URLs cannot be edited once they are set up, but blog titles can be changed at any time by going to Settings > General in the blog’s dashboard. So student’s can go back and update their title.
It’s a good idea to ask them to keep their name in the title, but other than that you can let them be creative:
- Susan’s Words of Wisdom
- Susan’s World
- Susan Says
- See It With Susan
Save everything
Remember to save all the usernames, passwords, and blog URLs you create for your students in a document or spreadsheet. It’s a safe bet that at least one student will forget their login credentials at some point, and it’s much easier to get them back on their blog quickly if have you them saved rather than going through the Lost Password process or contacting our support team to help reset it for them.
Like An Easier Option?
Do you use Google Apps or LDAP for student email accounts? CampusPress networks can be set up to authenticate against Google Apps, LDAP and other forms of Single Sign on.
User accounts are auto created the first time the student logs in with their school username and password; and can also be set to auto create their blog (if you want). Account creation made easy and no more issues with students forgetting their username and password.
Learn more about CampusPress here!
Your Tips
Do you have any of your own tips for student account creation, or creative methods you have devised to meet district privacy guidelines?
If so, we’d love for you to share them in the comments below.

I am very glad that you made this JASON and not Sue waters
This is great! I am looking forward to using this in the upcoming semester. Can you tell me, do the posts that I make as the owner of the website remain separate from the class blogs using this method?
If you use My Class and it is set to ” No – use if you want them to publish posts on their student blog” for what the students can do on the class blog then only the teacher user can publish posts on the class blog using Posts > Add New. All posts published by the teacher will be displayed on the class blog while all students will be able to publish posts on their own student blogs. Every post from all blogs attached to My Class will automatically feed into the Reader in the dashboard where the teacher and student can read and easily comment on each others posts. You can disable the ability to read posts in the Reader if you need to keep each student blog entirely private only viewable by that teacher and student.
Sue Waters
Great list of considerations. I documented my own workflow here http://readwriterespond.com/?p=1179