Whether your blog is for other teachers, families, or members of the wider education community, there are people out there who want to read what you’re writing.
Remember: just because you publish something online, doesn’t mean it will be seen.
Social media is a great place to share your blog posts, but there are problems. Algorithms and the “pay to play” model are changing the landscape of social media. Your loyal followers may not end up seeing all your updates.
Having an email newsletter is an excellent way to build and serve your community.
Our last post explained how to send out emails automatically to your readers using RSS and Mailchimp.
This post takes things a step further. You’ll learn about the benefits of creating a handcrafted newsletter using Mailchimp. We’ll help you plan for success and get started.
The Benefit Of Creating Emails Manually
We know it’s definitely a good idea to have some sort of option available for readers who would like to receive an email when you publish new blog posts.
Most people check their email every day and it’s more of a sure bet than sharing your posts on social media and hoping for the best.
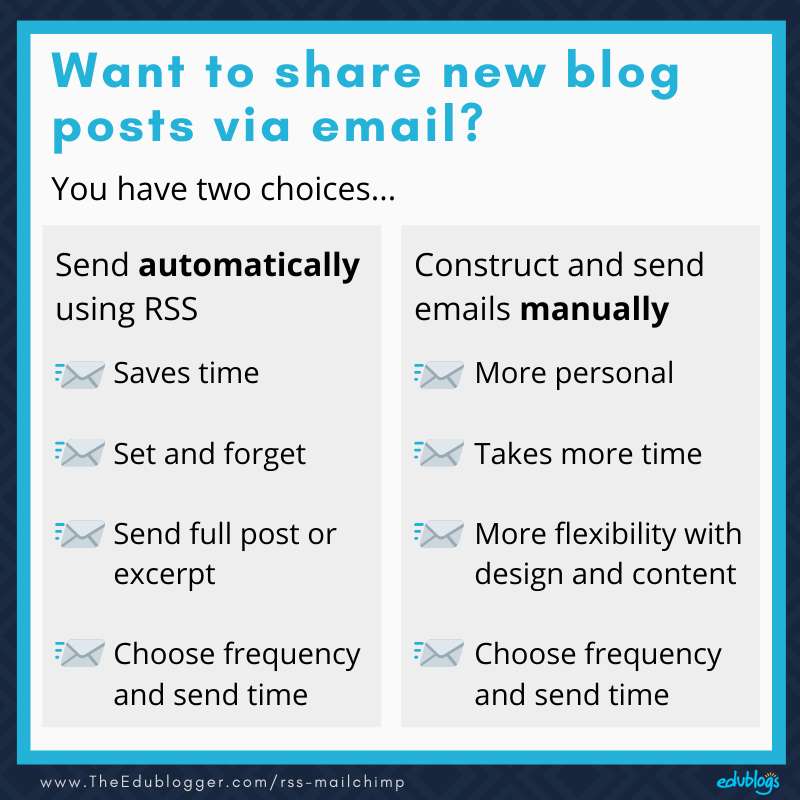
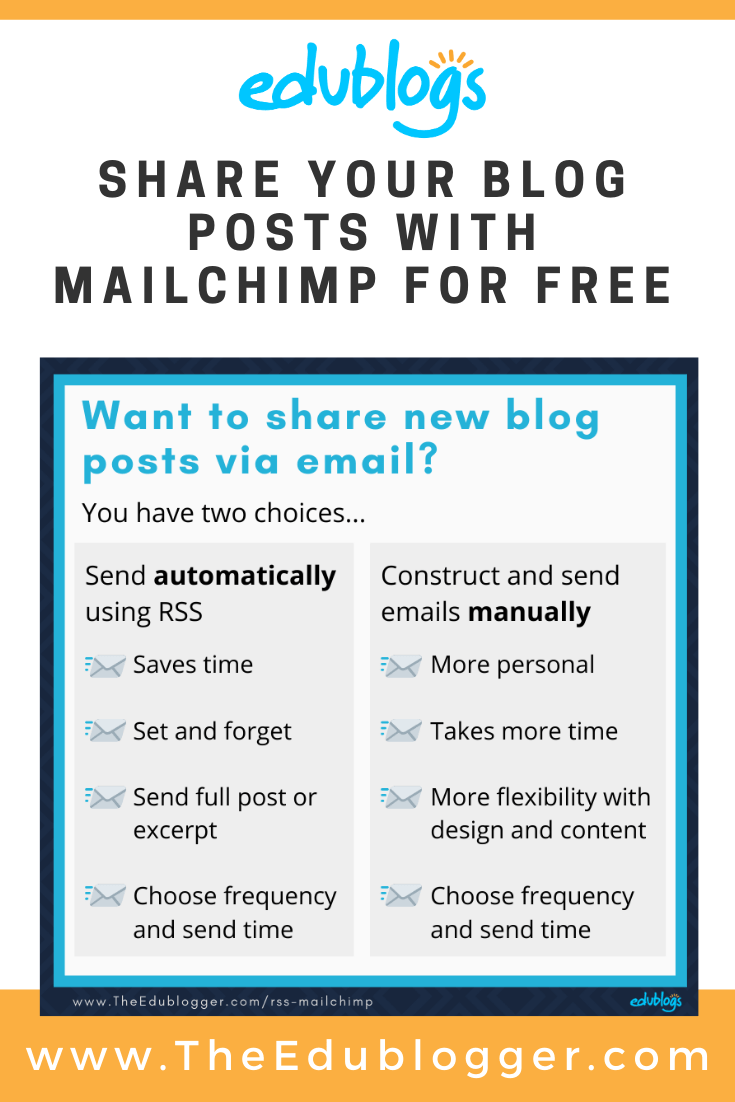
Our last post explained the two choices for sending out emails when you publish new blog posts.
- You can create an automated service using RSS. This is a good option if you’re time-poor and need a quick “set-and-forget” method.
- You can create a handcrafted newsletter that really helps you build relationships with your readers. This can take a little longer but the emails might be better received by your audience. You also have more flexibility with design and content.
Here’s a summary graphic of your two choices:
Remember to check out our previous post if you want to learn how to set up RSS.
How To Set Up Your Email Newsletter
This guide takes you through 4 steps to getting your email newsletter set up:
- Planning
- Register And Set Up Your Mailchimp Account
- Create An Email Campaign
- Design Your Email
Part One: Planning
Before you begin, it pays to take a bit of time to consider your plan.
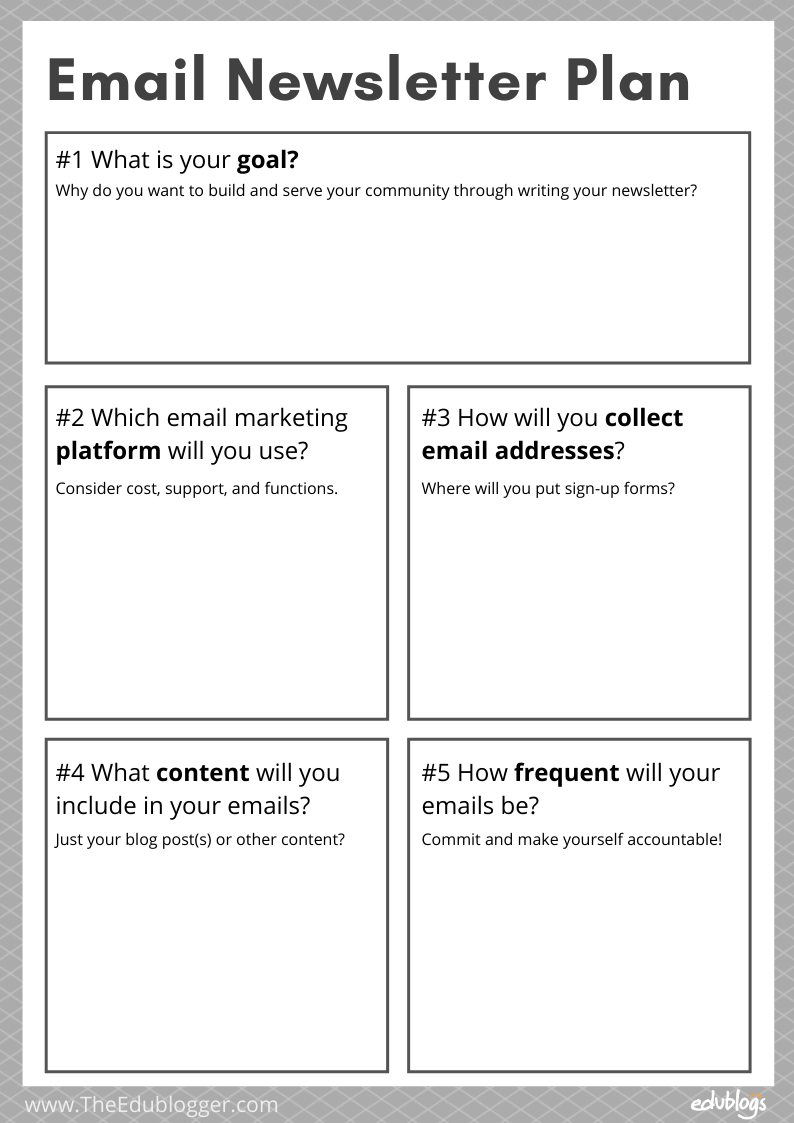
Here are 5 key questions to consider. Scroll down for a printable planning worksheet.
#1 What is your goal?
Creating an ongoing email newsletter can take a little work but there are rewards. Consider why you want to build your following and community through a regular newsletter.
This isn’t information you need to make public but it’s good to keep in mind.
- Perhaps you want to network and enjoy future career opportunities (a new job, promotion, or speaking engagement?).
- Maybe you want to form a strong relationship with the parents of the students you teach. We know how powerful that is.
- Perhaps you want to build your PLN so you can learn from and with other educators across the globe.
This goal is probably related to the reason you set up a blog in the first place.
#2 Which email marketing platform will you use?
This tutorial uses Mailchimp. We have no affiliations with Mailchimp but have used it for 10+ years and it’s one of the most popular platforms out there.
Importantly, Mailchimp is free if you have under 2000 subscribers. It’s fairly intuitive to use (drag and drop) and their help documents are excellent.
If you’re interested in comparing different email platforms, check out this guide from ProBlogger or comparison chart from PC Mag. We encourage you to find the provider that works best for your needs.
#3 How will you collect email addresses?
Obviously, you have to do this legally. You can’t just start emailing people without their permission.
When you set up an account with a platform like Mailchimp, you’ll have access to a URL with your sign-up form.
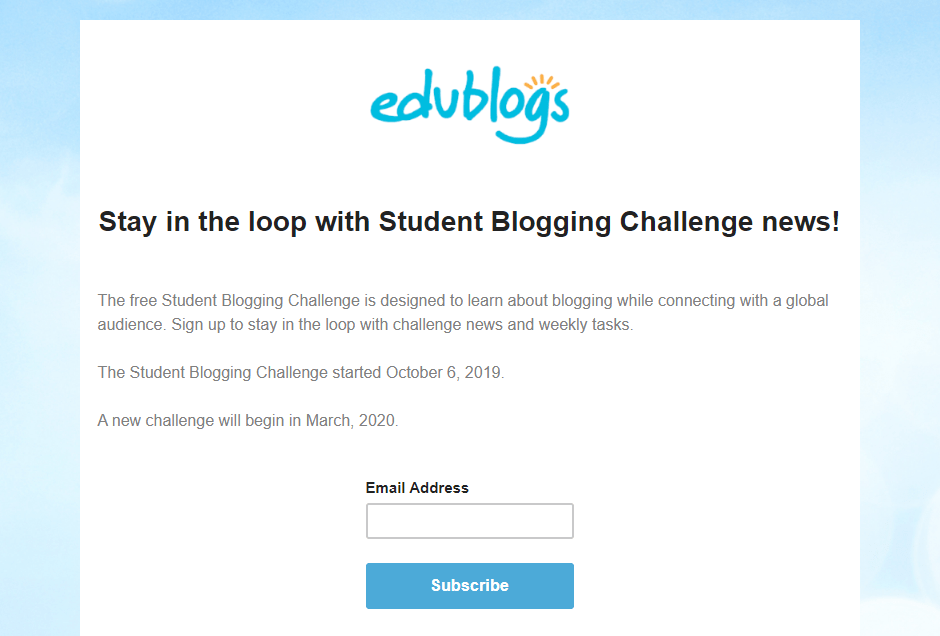
For example, this is what our sign-up form looks like for the Student Blogging Challenge:
https://studentchallenge.edublogs.org/stay-in-the-loop-with-student-blogging-challenge-news/
You want to make it as easy as possible for people to know about your newsletter and how they can opt in.
Here are some key places to consider sharing your sign-up form:
- On your blog (on the sidebar, on your About page, and/or at the bottom of your blog posts). Some people also like to have pop-up notifications.
- In social media posts or in your bio
- As a link under your email signature
- Email the link to your sign-up form to your contacts who might be interested
#4 What will you include in your emails?
The main thing you probably want to include is your latest blog post(s).
Some people copy and paste the whole blog post into an email but a more popular approach is to summarise it and include a link for subscribers to keep reading.
Some people also like to include other information in their newsletters such as:
- Other great posts you’ve read
- Online tools you’ve come across
- Podcasts or videos you’ve enjoyed
- Classroom or personal anecdotes
- Pep talks or inspirational quotes
Your content could basically be anything you think might be of value to your readers. Are you aiming to educate, entertain, inspire? Perhaps a mix of all three?
It pays to consider the needs of your audience and stick to the topic(s) you’re known for e.g. edtech, social studies, English teaching etc.
Also, consider whether you want an image-heavy email or a simple plain text newsletter? There are pros and cons but simple does work for some people.
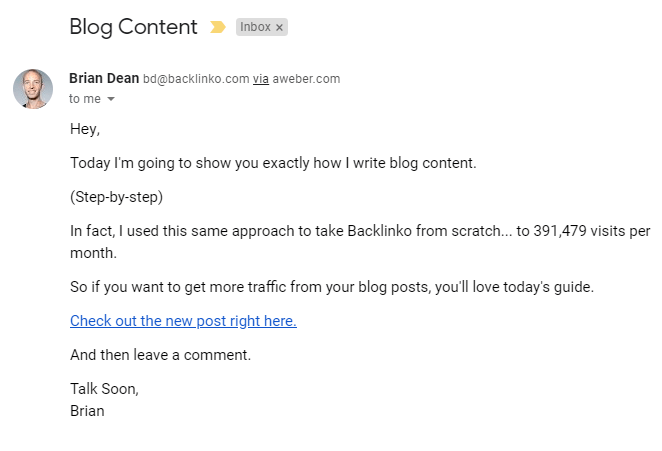
Here’s an example from well-known SEO blogger Brian Dean who has hundreds of thousands of subscribers. Brian uses a very simple image-free design with text that’s friendly yet to the point.
#5 How frequently will your emails be sent out?
You don’t have to tell people how often you’ll be sending out emails but it can be a good way to stay committed to your blogging goals.
For example, if you say you’ll be sharing a new blog post every two weeks or every month, you’ll have the incentive to do it! Your readers will be waiting to hear from you.
This printable planning PDF will help if you want to jot down your ideas before moving on.
>>Click here to download a PDF copy.
Part Two: Register And Set Up Your Mailchimp Account
This part is fairly straightforward although we recommend Mailchimp’s getting started guide if you’re unsure.
The three most important steps to explore are:
- Set up your account: You need to enter your name and email address to register. This only takes a couple of minutes.
- Set up your audience: These are the email addresses you’ll be sending to. Your audience could be very small to begin with but don’t worry. It will grow! The free version of Mailchimp only allows you to have one audience group.
- Customize your sign-up form: Setting up a sign-up form is essential so you can start collecting email addresses that will be part of your audience. You can customize the look and feel of this form and your form will have a URL that you can share with others.
Registration tips:
- You don’t need to submit any payment. Mailchimp is free until you have over 2000 subscribers. When you do hit the 2000 mark you can decide about payment options although the best first step would be to “clean up your list”. This means you archive subscribers who aren’t opening your emails or no longer want updates.
- You’re legally obliged to provide a physical address. This address will show up automatically in the footer of your emails. You probably do not want to use your home address! We recommend using a work address or PO Box.
- Which email address do you want to use? Even though you’re sending your emails out through Mailchimp they still come “from” your email address. So, if you have both personal and work email addresses, consider what would be the best to use for this project.
Part Three: Create An Email Campaign
1) Login to your Mailchimp account
Click on “Campaigns”.
 2) From here click “Create Campaign”

3) You’ll be presented with a range of campaign options
Click “Email”.
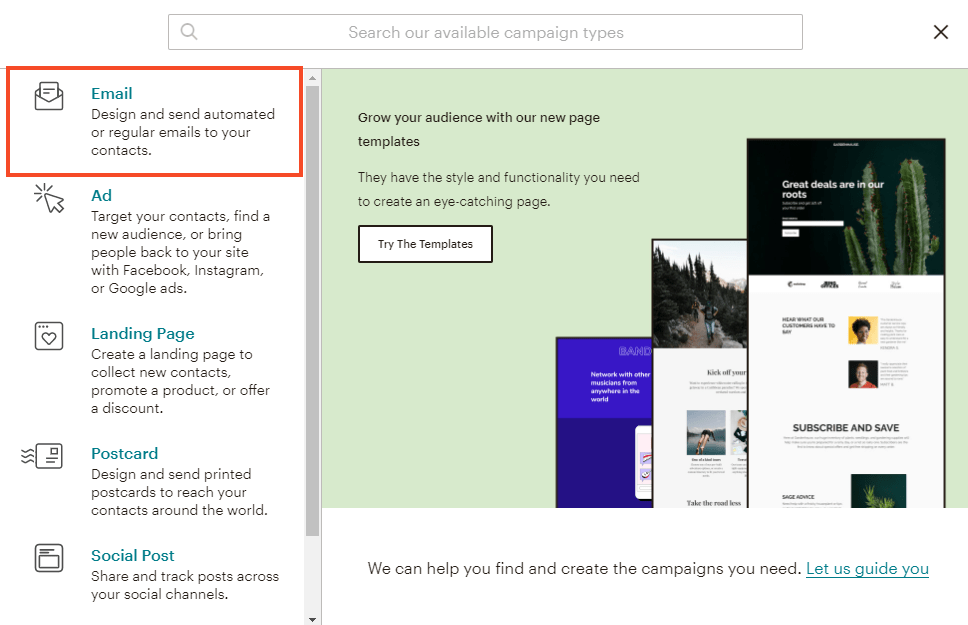
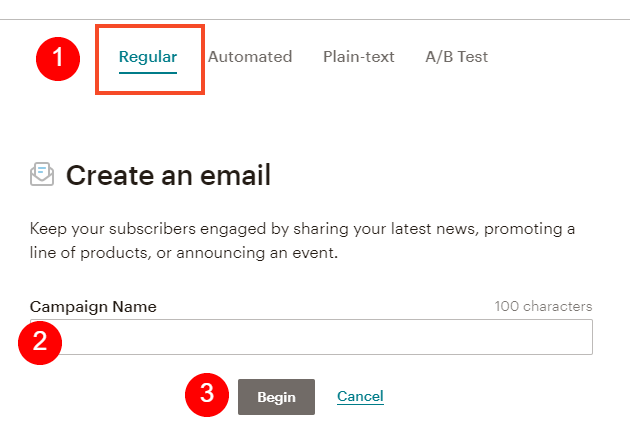
4) Click on “Regular”
Type a Campaign Name (subscribers won’t see this) and then press “Begin”.
5) Fill out your campaign information
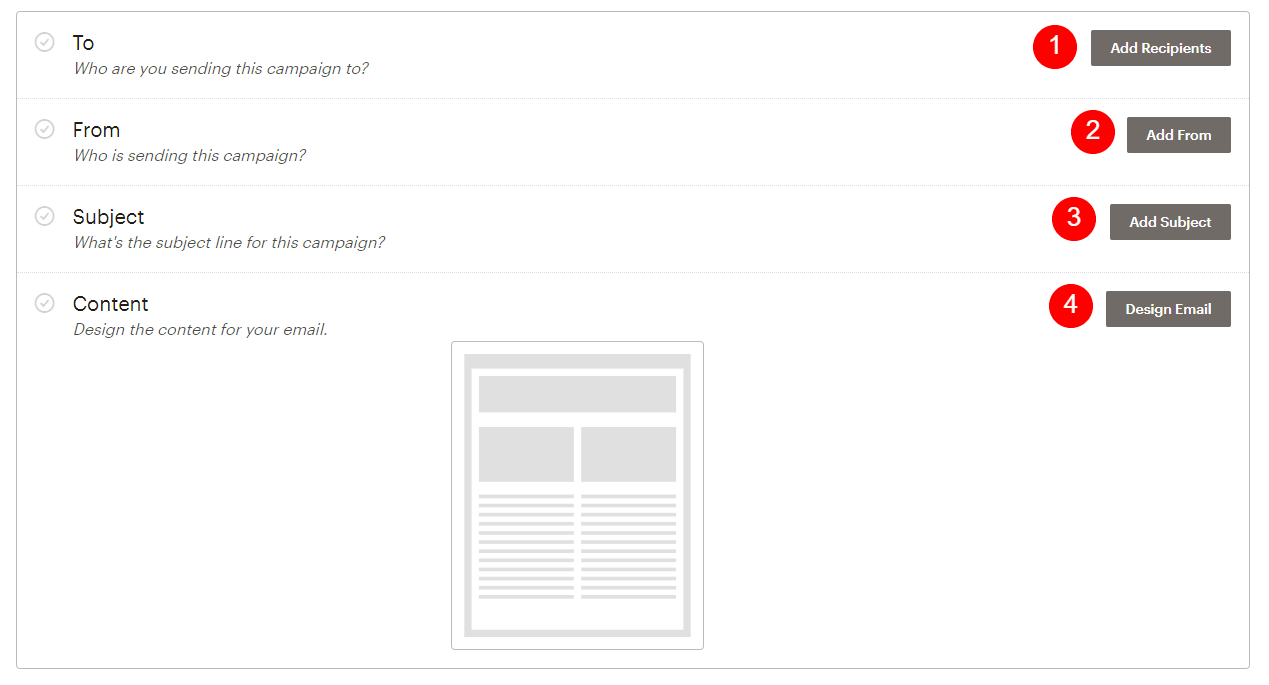
You are now presented with four important steps to create your campaign.
- To: This is the audience you’re sending the email out to.
- From: Enter your email address. Make sure this isn’t an email address you need to keep private.
- Subject: Subscribers will see this when your email lands in their inbox. Make your subject line specific and interesting to encourage them to open it!
- Content: This is where you design your actual email. We’ll explain this more below.
As each of these four tasks are completed, a green checkmark will appear.
If you scroll down further you’ll see an option to personalize your campaign link. This is the URL for the email that you’ll be able to share online once you send your email (perhaps on social media). All users can edit their campaign link but you have to be a paid user to include your website domain. Click here to read Mailchimp’s help guide on campaign links.
If you need more assistance filling out the to, from, or subject field, check out this help guide from Mailchimp.
Let’s take a closer look at designing the content of your email…
Part Four: Design Your Email
The final step involves putting the content of your email together.
1) From the campaign builder page, click “Design Email”
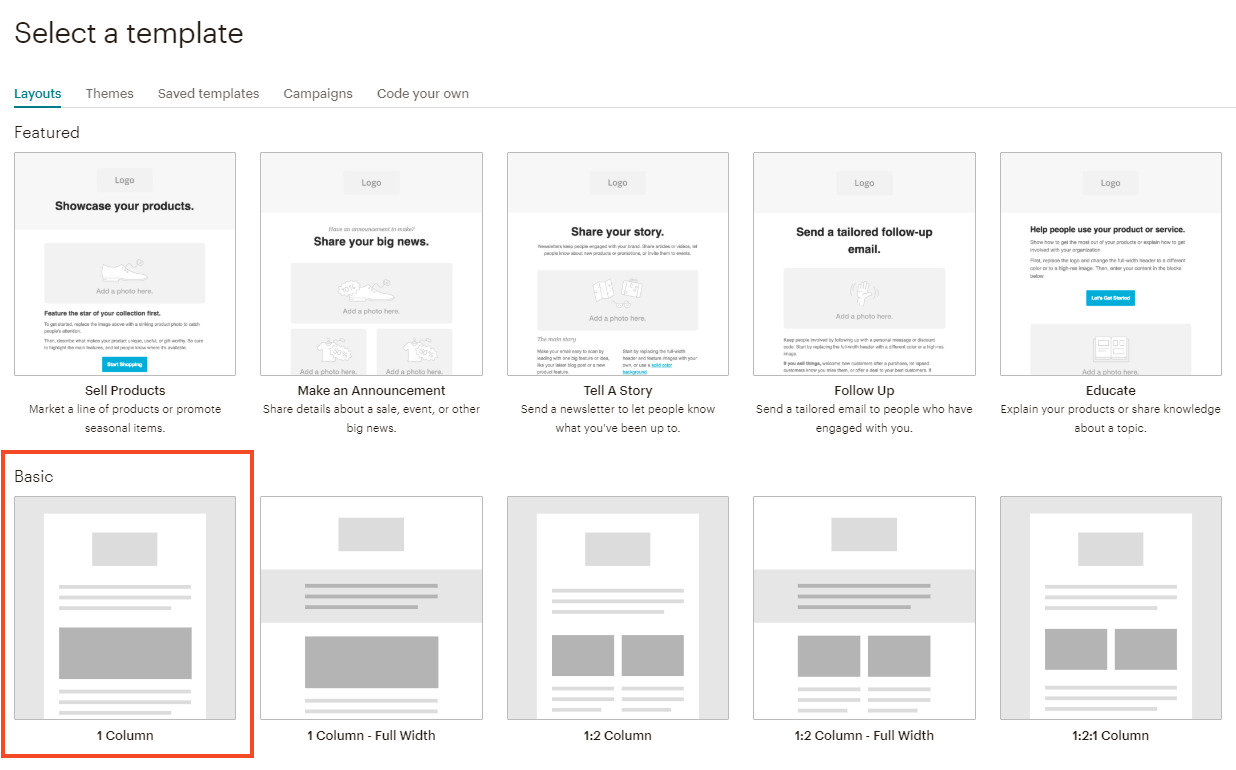
2) Select your template
The free version on Mailchimp only includes the basic templates. This is fine.
If you’re not sure what template to choose, stick with the basic “1 column” template. You can always change it over time.
4) Design Your Email
It’s now time to design the look of your emails. If you’re new to Mailchimp, you can definitely keep this simple!
Here are the most important steps:
a) Add an image to the top of the email
Hover over the word “Logo” and click on the pencil icon. Follow the prompts to upload an image that represents you and your website.
(If you don’t want an image just click on the trash can icon in the Logo box).
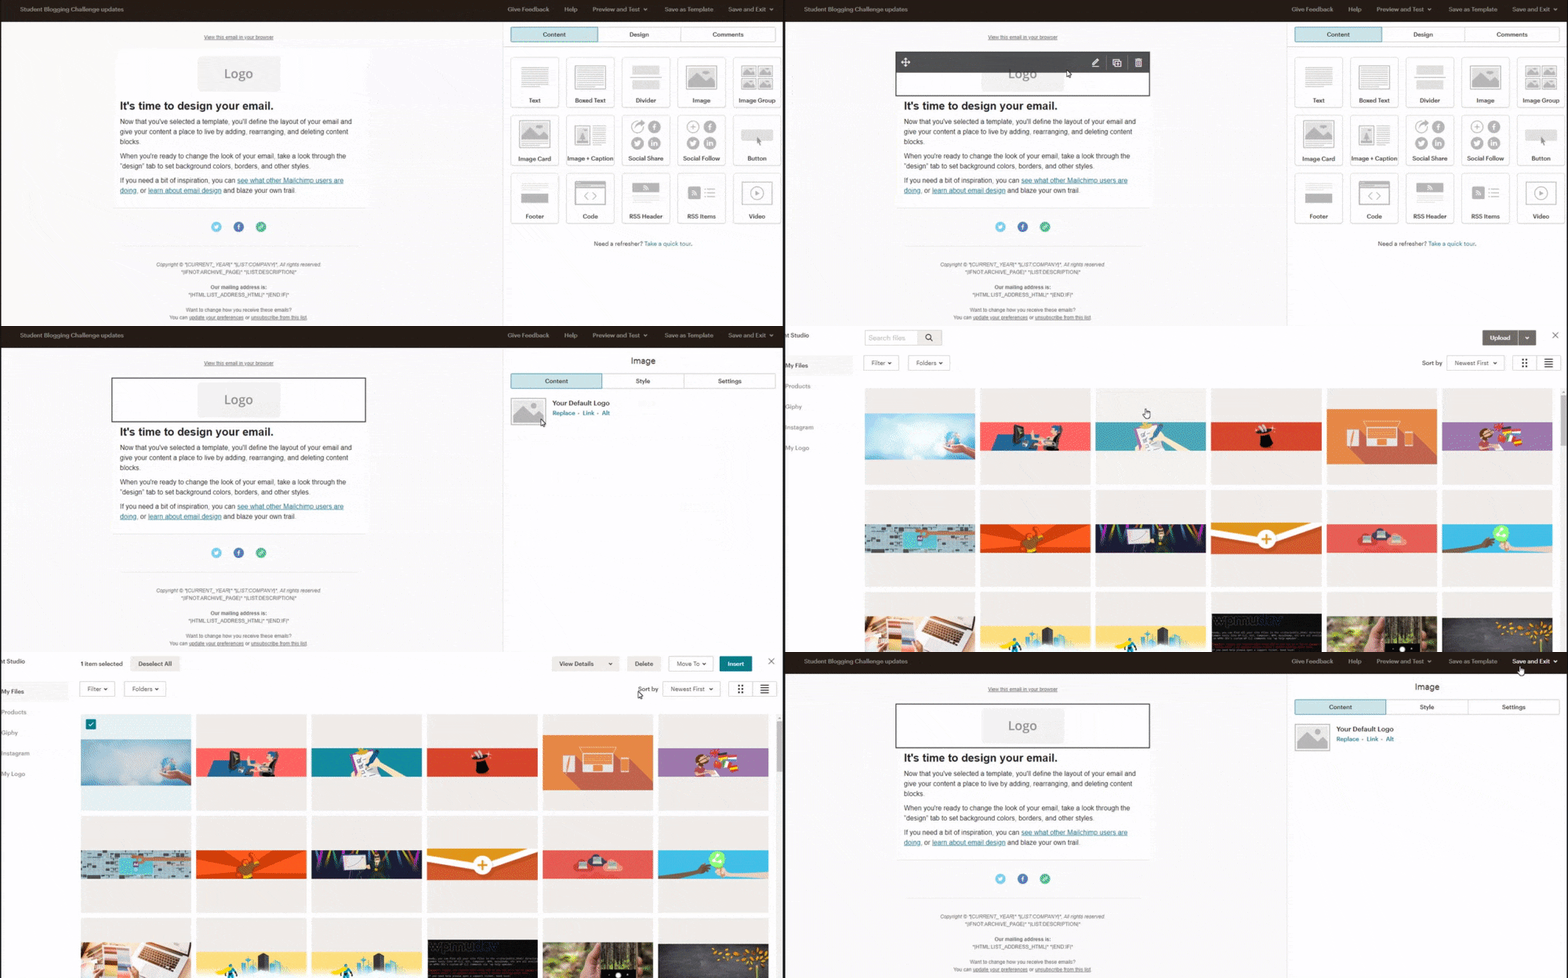
b) Edit the text
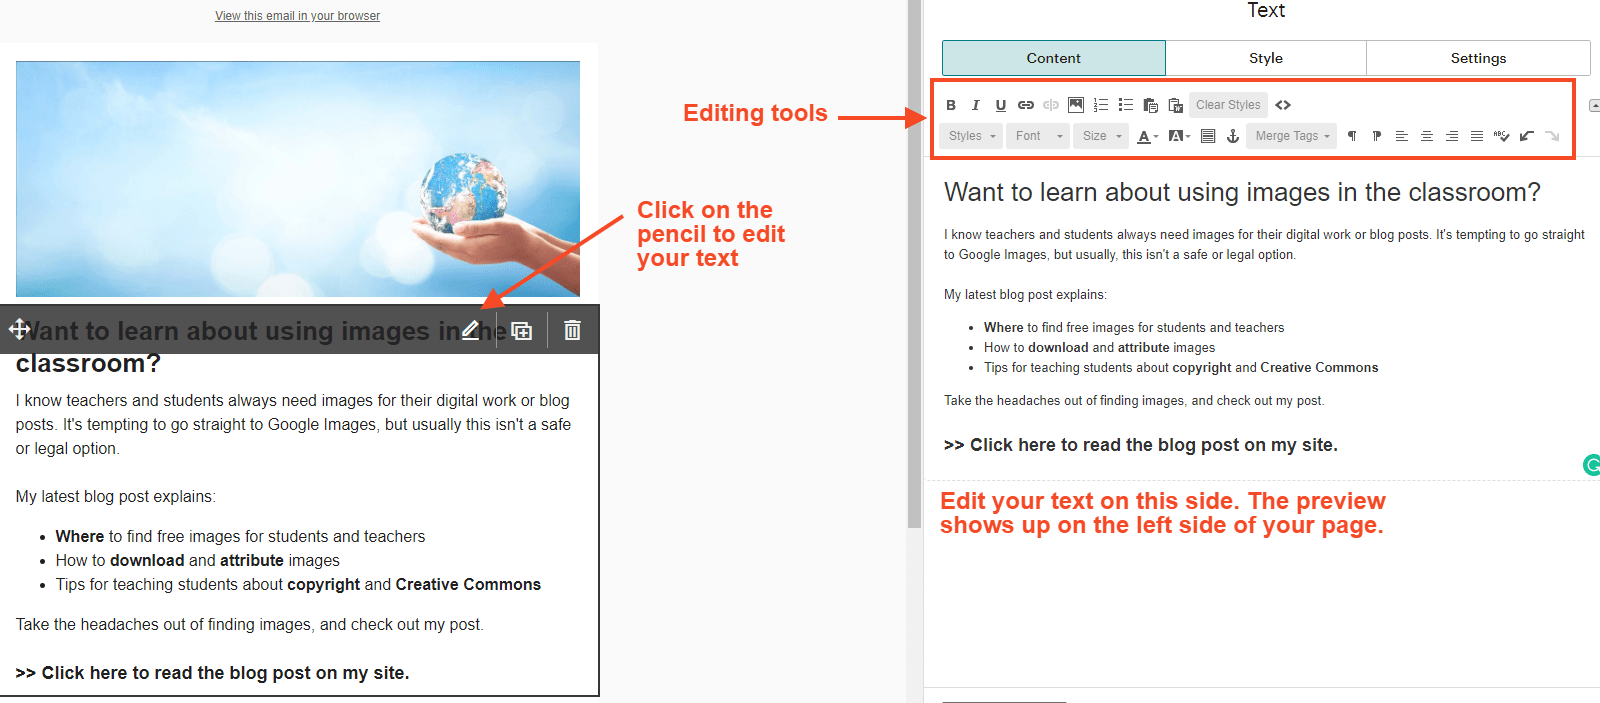
Hover over the block of text and click on the pencil icon. You’ll write the text of your newsletter on the right-hand side using the familiar editing tools to format (bold, italics, link etc.).
You might start by introducing your new blog post and then add the link to your blog so subscribers can read the full post.
If you have any other interesting information to share such as other useful links or tips, add this underneath.
Tips for writing your newsletter:
- Make your newsletter easy to read with bullet points, lists, short sentences/paragraphs, bold words, and headings.
- Use lots of white space and keep your text short.
- Write like you’re talking to an individual person, not a group of people (e.g. use the word “you”).
- After you send out a few email newsletters, take note of which ones received the most opens and clicks. What was different about these? Interesting subject line? Unique layout? Perhaps the time of day you sent the email worked well?
c) Add an image to the body of the email (optional)
There are different schools of thought about whether you should use images throughout your newsletter.
Some people like images to break up the text and illustrate the content. Plain text emails are also very popular and some people find a very simple email is better received.
If you do want to add images to your email, drag over an image block from the right-hand side to the work area on the left-hand side. You’ll then be prompted to upload your image.
There are different choices available. You can drag over a simple “Image” block or “Image Group”, “Image Card”, or “Image + Caption”.
Learn more about designing your email in this help guide from Mailchimp.
d) Test your email
A final helpful tip is to preview what your email will look like and/or send a test email to yourself or someone else who can offer you feedback.
You’ll find these options at the top of the page under “Preview and Test”.
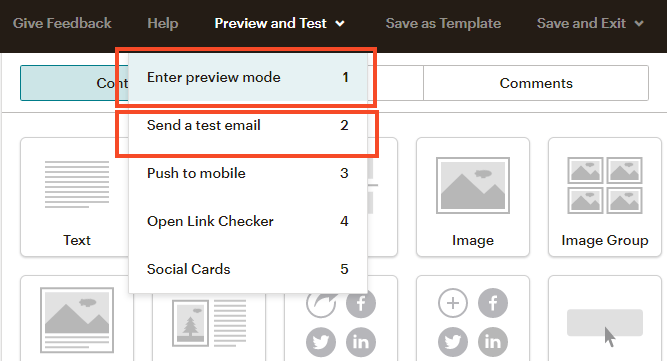
“Open Link Checker” is another very helpful tool if you use multiple links in your email. It helps you double-check they’re all correct!
Select “Save and Close” in the bottom right-hand corner of the page when you’re ready to move on.
5) Confirm and send
Once your email is all set up, you should see a green checkmark next to the To, From, Subject, and Content sections of the Campaign Builder.
You can check your details and then use one of three options:
- Finish later: This will save your draft which you’ll be able to access under Campaigns in the future.
- Schedule: You can choose a time you want your email to be sent out (you can experiment with sending times as you get going).
- Send: Your email will go out straight away.
Save Time In Future: Replicate Your Email
We’ve mentioned that creating a handcrafted email does take a little bit of extra time than the RSS option, however, you don’t have to start from scratch every time.
You can replicate a campaign to create a copy of any campaign in your account.
All you need to do is:
- Log in to Mailchimp and go to Campaigns
- Click the drop-down menu for the campaign you want to copy and select Replicate.
Follow the prompts to edit your campaign details. Check out Mailchimp’s guide to replicating campaigns for more information.
Another option is to create your own template which you can use when writing new emails. Mailchimp’s help guide walks you through this process.
Bonus Tip: Create An Opt-In Offer!
If you want to get really serious about building your email list, do what the pros do: offer an opt-in or freebie for subscribers!
Offering your readers an opt-in offer or “content upgrade” is a proven way to grow your email list. An opt-in freebie is simply a free downloadable file.
Your readers might be on the fence about signing up for your newsletter or they might not even realize you have a newsletter.
An incentive might be all they need to hand over their email address and join your community. Then surely they’ll like what you offer and stick around!
What can you create as an opt-in offer? Here are some ideas:
- A printable PDF version of a popular post
- A cheat sheet or summary of something you’ve written about
- A checklist
- A list of resources
- A printable that can be used in the classroom (worksheets, planners, displays)
- An eBook covering a topic in more depth
Where would you design your freebie? Two popular free design tools are Google Drawings and Canva. We have guides to both of these tools:
If you’re using Mailchimp, this guide explains how to send a file (freebie) to new subscribers.
You’re putting the effort into writing your email newsletter, so you want as many people as possible to enjoy it, right? An opt-in offer could be the solution you need to grow your list.
The only thing to remember is if you grow your list too rapidly, you’ll have to pay to use your email platform. For example, Mailchimp is free until you have 2000 subscribers. Remember to clean up your list before paying!
Conclusion
It’s an excellent idea for all bloggers to offer readers a chance to be notified of new blog posts via email.
If you’re short on time, you can set up RSS emails using a platform like Mailchimp.
However, you might find your emails are better received if they’re more personalised. You’ll need to invest a little time into the process but the rewards might be greater!
Remember, some bloggers also like to use a combination of RSS and personal emails. For example, you could set up RSS so emails are sent out every time you write a new post. You could also write a monthly summary email.
Find out what works for you and enjoy the benefits of building a community around your blog.
Any tips or questions? Leave a comment below. We’d love to hear from you!
Related Reading
You might also enjoy:
- A Plan For Writing A Weekly Blog Post In 10 Minutes A Day
- Resources To Introduce Edublogs To Others
- 5 Ways To Share And Market Your Teacher Blog
- 12 Tips For Maintaining Momentum With Blogging





![Replicate a campaign in Mailchimp following the steps described above [screenshot]](https://www.theedublogger.com/files/2019/11/Replicate-a-campaign-mailchimp.png)
Very informative post. Its a good help for people who are newbie to Mailchimp. In my recent on email marketing tool, I found sende.io is best suitable email marketing automation for business and freelancers. I found sende.io tool is very easy to use as interface is pretty much simple.
Thanks for all the time you put into creating this tutorial. It’s clear and helpful, especially if you already are comfortable using Mailchimp. Hopefully many more people have benefited from this post than the number who have commented. 🙂