I’m frequently asked how to add images to blog sidebars — so I thought it would help to share my quick and easy cheats method.
So what do you need to know to do this?
To start with you need to understand that you need to:
- Write HTML code which links to the location of your image
- Add your HTML code to a text widget in your sidebar
Now that I’ve said blah blah HTML code twice…you’re probably thinking that I’ve made it too hard already.
It’s not but I first need to explain what is HTML code and then show you it’s really easy when you know my trick 😎
What is HTML?
HTML is short for “Hyper Text Markup Language” which is a language used to tell a browser how to organise the layout of a web page it has downloaded from the Internet. It influences if text is bold, italics, a heading, bullet points.
When you write a post or page inside your blog dashboard you don’t worry about how to write HTML because the Visual Editor does it for you. If you click on the HTML tab it shows the HTML code in your text.
Here’s the Trick!
As I said you need to use HTML but that doesn’t mean you can’t cheat with writing the HTML code.
Instead use your Visual Editor to do the work for you!
Cheating is as simple as:
1. Open up a draft post in your blog dashboard
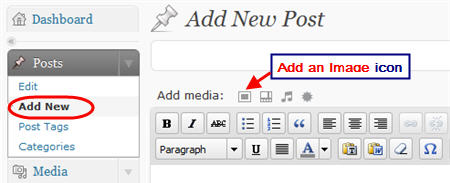
2. Click on Add an Image to upload your image to the post
- Ideally resize your image before uploading to 170 pixels wide because this generally the best width for most blog sidebars
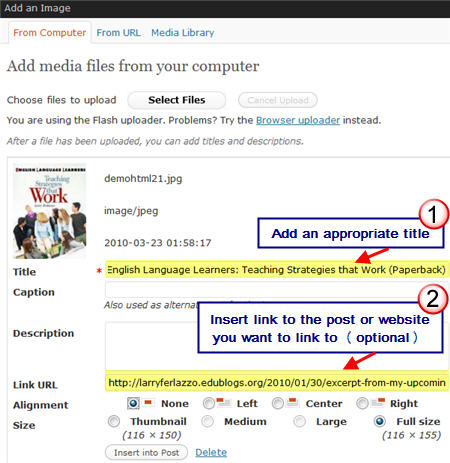
3. Insert the title for your image (this displays when a reader hovers their mouse over the image)
4. Change the link URL — if you want to link your image to a website
- In this example, I’ve change the link so it goes to http://larryferlazzo.edublogs.org/2010/01/30/excerpt-from-my-upcoming-book-on-teaching-english-language-learners/ instead of the image URL
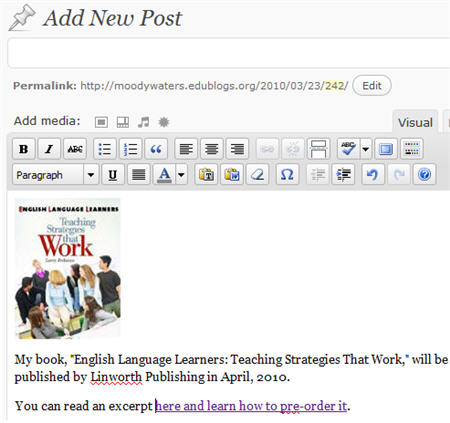
5. Click on Insert into Post
6. If you want to add any text below your image — just write it!
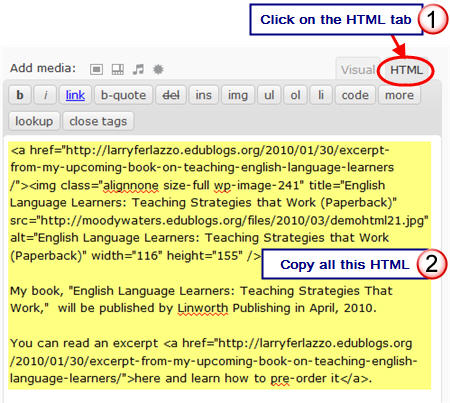
7. Now click on the HTML tab and copy all the HTML code.
8. Go to Appearance > Widgets in your blog dashboard
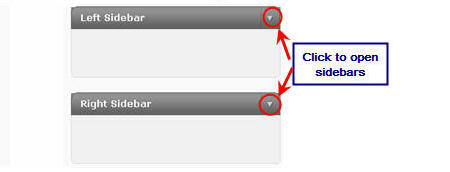
9. Click on the desired Sidebar to expand (so you can add the widgets)
Please note: In new blogs sidebars in your dashboard are empty and adding widgets automatically removes the default Edublogs widgets
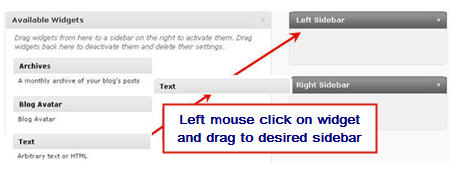
10. Add a text widget to the desired sidebar by dragging it from the Available Widgets on the left into the Sidebar area on the right.
11. The widget will automatically open — add a title to your widget, paste the HTML code and click Save
- If you want to insert lines for better text spacing you need to add the HTML code <br/ > (means insert line break)
12. When you check your blog you should now see it nicely displayed in your sidebar!
- Belows what it looks like in Larry Ferlazzo’s Websites of the Day… right sidebar
- If you check it out on his blog you’ll see that hovering over the image displays the image title and clicking on the image takes you to the post on the book

Enjoy!
P.S. Don’t share this tip with Larry Ferlazzo as he pays me in chocolate for each image I add to his blog sidebar 😎
If you are enjoying reading this blog, please consider ![]() Subscribing For Free!
Subscribing For Free!
Thanks for the awesome tip! A lot easier than I thougt.
I can’t tell you what this did to keep me from pulling my hair out. Thank YOU SO MUCH!
Heya! I realize this is somewhat off-topic but I needed to ask.
Does building a well-established blog such as yours require a
massive amount work? I am completely new to
running a blog however I do write in my journal everyday.
I’d like to start a blog so I will be able to share my personal experience and thoughts online. Please let me know if you have any suggestions or tips for brand new aspiring bloggers. Appreciate it!
Take a look at my website; learn bar chords
Thanks for every other magnificent article. Where else
may anyone get that type of info in such a perfect method of writing?
I have a presentation next week, and I am at the search for such info.
Feel free to surf to my site bangla song mila
Thank you sooooooo much. The amount of time I spent trying to squeeze an image into my blog avatar widget… XD
Thanks a lot! This trick made it all so easy.
WoW Thank you so much this helped me sooooo much!