It’s official! Edublogs has decided to allow javascript, iframes and object code.
So what does this mean? Besides the fact that I now have to make changes to several previous Edublogger posts, our life has just become considerably easier because we can just copy and paste pretty much most ‘embedding’ code we pick up around the web directly into either our Edublog posts or a text widget in our side bar.
Embedding into a post
Say for example you wanted to embed a Google Presentation:
- On your blog dashboard, go to Write > Post
- Completely write your post adding all text and images including adding your categories, tags and post title.
- It’s best to add any code you want to embed as the last step just before you click publish as you’re less likely to have problems.
- Click on Save and View this Post to do any final edits on your post
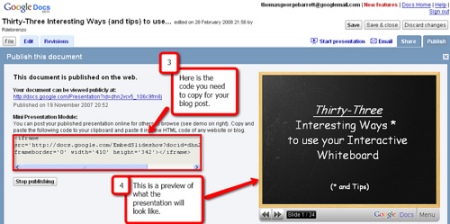
- Copy the embed code from Google Presentations


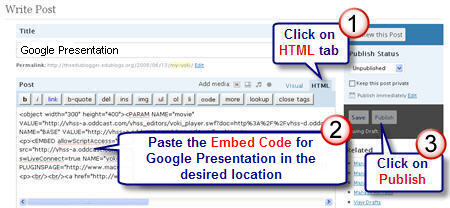
- In your Post panel click on your HTML tab. Paste the code from Google Presentation in the desired location and immediately press Publish.
These screenshots of how to embed a Google Presentation were kindly provided by Tom Barrett. Check out Tom’s post to see what a Google Presentation looks like embedded in a post (and while you are there thank him for sharing his screenshots).
Tom, like many educators, likes using Google Documents, in place of PowerPoint or Keynote, to create presentations because it means he edit his presentation online, from any computer, and invite others to help him create the presentation.
In case you are interested in how we create our screenshots – I mostly use SnagIT (need to purchase) and Tom used Jing (free to use).
NOTE:
If you change back from the HTML Tab to the Visual Tab you may not see the item embedded in your draft, depends on what your trying to embed; don’t stress it’s there and will appear when you save the post.
TIP:
iFrames and objects can be a bit touchy to embed; when in doubt I recommend that you add all text and images to your post then add the embed code just when you are ready to publish the post.
Here are some of the creative ways Edublogs users have started using this new freedom in posts:
- Alice Mercer has been Testing Splashr Slideshow
- Frank tried out Cover It Live blogging
- Tom Barrett has embedded Google Presentations
- Madrona added byTheBoxes
- Room18space embedded a mind mapping tool from mindmeister.com that students have been working on collaboratively
- Mike Temple test out Google Calender and a GCast player
- I’ve embedded Technorati charts and Flickr Slideshows on my Mobile Technology in TAFE
Embedding using a text box in your sidebar
Instead of embedding in a post you can also add JavaScript, iframes and object code to your sidebar by using the same method outlined for Adding A Voki Speaking Avatar To Your Blog Sidebar.
Here are some of the ways Edublogs users are using this new freedom in their blog sidebar:
- Frank and Kate Olson have both added GTalk chatback (actually Frank’s got lots of cool widgets worth checking out – read more about widgets here)
- Carol Daunt Skyring added a FeedJit widget to her left sidebar
- I’ve added Lijit Search, CoComment and Shared Google Reader on my Mobile Technology in TAFE
FINAL THOUGHTS
This is a really brief introduction into embedding javascript, iframes and object code into Edublogs. Let us know how you go especially the creative ways you use this new freedom. Remember to drop past Tom’s blog and thank him for the use of the screenshots.
If you are enjoying reading this blog, please consider ![]() Subscribing For Free!
Subscribing For Free!

Sue, I just embedded a Google presentation into http://2webwatchers.edublogs.org/2010/01/25/107/ . I’ve made it open to everyone without signing in, but it doesn’t appear to be edible. But I’ve found the same issue with Tom Barrett’s Interesting Things session. Even though his slideshows appear in my Google Docs list as “to everyone,” I can’t actually edit them.
I must be missing a step, no?
@Gail Desler, Can you share that Google Presentation with me (by sending me an email invite) so I can check out the settings and work out what is possible?
What kind of plugin have you used for this in WPMU ?