Every teacher should have a class website to keep students and parents up-to-date.
Even more important is keeping this website updated regularly – ideally on a daily or weekly basis. But don’t worry about updating just yet, there are tips at the end on how to make the regular updates easily possible!
First, let’s walk through the steps of setting up your site and what all should be included.
Step 1 – Get a blog
Blogs make the perfect class website because they are easy to update and have subscription features built right in.
Of course, we recommend Edublogs as the best tool for your class website, and the steps outlined here will be specific to Edublogs. However, much of the advice works well for other blog services too.
If you aren’t quite sure what exactly a blog is, check out this quick video first – it will have you up to speed in no time.
Part of the blog creation process is choosing a URL for your site. Ideally you want to keep your URL short, easy to remember and suitable to be reused for several years.
A simple option is to use your name in the URL like this:
- Mr. Baldock’s Class (http://mrbaldock.edublogs.org)
- Mr. Salsich’s Class (http://jmsalsich.edublogs.org/)
Alternatively, use something unique that has meaning like:
- Huzzah (http://huzzah.edublogs.org)
- The Skinny (http://edublogs.misd.net/theskinny)
Step 2 – Choose a theme
You can change your blog’s look (or theme) by going to Appearance > Themes in your dashboard.
Don’t spend too much time on this step right at the beginning, because you can easily change your theme at anytime.
However, look for something that has menus across the top.
More on choosing your theme is found here.
Step 3 – Setup your pages
You will want at least 2 pages on your class website, so let’s go ahead and create them and then add the content to them later.
Go to Pages > Add New and create the following:
- About
- Contact
You’ll create them one at a time by giving the page a title and clicking Publish on the far right. Then repeat the process by going to Pages > Add New again.
You can also delete the ‘Sample Page’ that is there by default by going to Pages > All Pages, hovering over the title, and clicking Trash.

Step 4 – Edit your about page
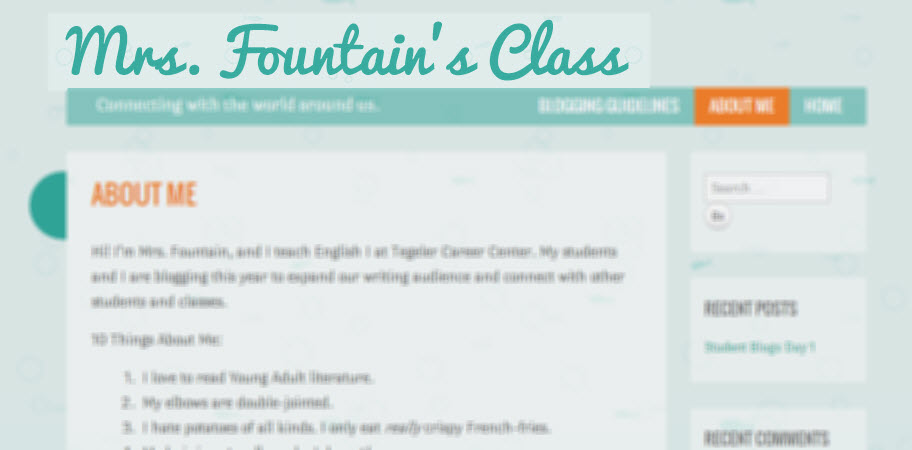
You’ll want to write up a quick biography to introduce yourself and your class to students and others that visit your site.
Include pictures of you (and even your family if you’d like), hobbies, education and teaching background, and anything else you are comfortable sharing.
Many also include information on the class and school (grade, number of students, etc).
Step 5 – Edit your contact page
Here you’ll want to put your contact information, including phone number, email address, and the best times to reach you.
Step 6 – Turn on email subscription
This is what makes it possible for parents or students to signup to receive an email with all new posts, which is an excellent way of making sure information is received.
Email subscription does require a paid Edublogs Pro or Edublogs Campus site.
There are two options to quickly turn email subscription on.
#1 – Go to Appearance > Widgets and drag the “Email Subscription” widget to the sidebar in your theme.
This adds a form right on your site that visitors can add their email address to.
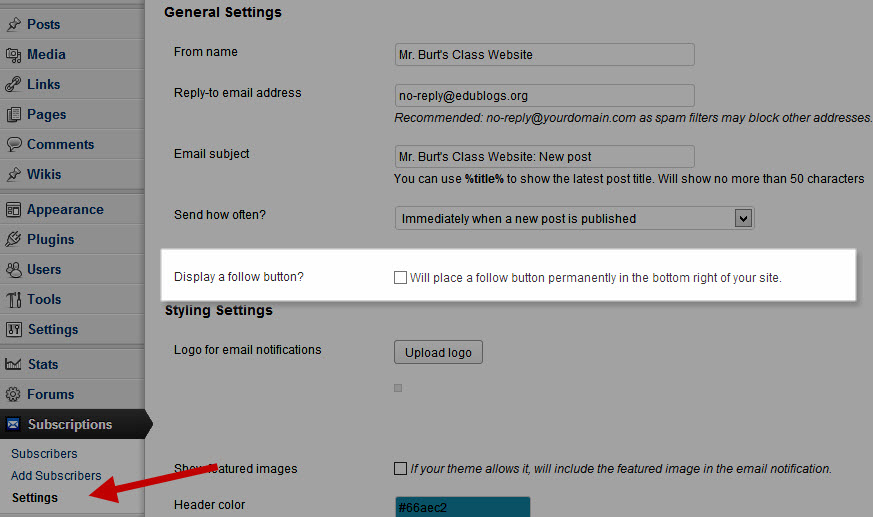
#2 – Go to Subscriptions > Settings and check the “Display a follow button” box.

This will add the little follow button in the bottom right corner, just like you see on this very blog.
More on how to add and manage subscribers and other options can be found here.
Step 7 – Write your first update or post
You are almost done!
All that is left are the regular updates – called ‘posts‘.
What you include is up to you, but here are a few ideas:
- announcements
- home work
- upcoming exams and important dates
- daily or weekly lesson plan summaries
- student work
- anything you want to share!
Just go to Posts > Add New and publish away!
Keeping it updated
I’ve been just as guilty as anyone of creating my beautiful class website, only to find that after a few months into the school year, adding to it and keeping it current often becomes one of those tasks that get put off due to grading, planning, and all the other time-sucks we all know all too well.
The trouble is, if a parent or student visits your site even once, and the information is not current, you can bet that the likelihood they return to the site or rely on it in the future drops significantly.
Tip! Schedule posts in advance
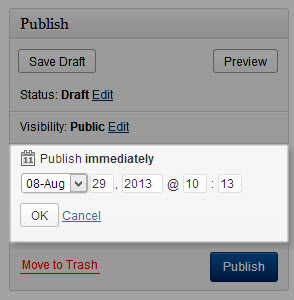
You can do this from the ‘Publish’ box by choosing a date and time in advance for the post to be made live.

This way, you can plan out your week in advance with daily posts, for example, and forget about your website, knowing that it will be updated when needed.
Tip! Have students make the daily post
Like an exit ticket, have a student write a daily summary of what was covered in class and information on assignments or homework.
Using mobile apps, students can even publish from their phones or tablets.
Simply add your students to your class website and you can even choose if you want to approve their posts before they are live.
No doubt that you’ll soon have students fighting over who gets to make the daily update! (Which is a good thing!)
Extras and More Resources
Embed a calendar
If you already use a Google Calendar to keep track of holidays and other important dates, why not share it on your site?
Add another page to your site and call it ‘Calendar’.
Then, follow these steps here to embed it right on the page!
Add a contact form
In addition to your contact information on your Contact page, how about adding a quick form for visitors to fill out that emails you directly?
These directions here will walk you through the simple form creation process.
Add a page for resources and links
Another popular page for class websites is a list of resources, files, and web links that students, parents, and others might need.
For example, links to curriculum documents, helpful videos or websites, and loads more.
Just go to Pages > Add New and create a “Resources” page and add away.
This help guide here will walk you through uploading and adding PDFs, documents, and other files.
Use custom menus for multiple subjects or classes
Do you teach multiple subjects, classes, or periods?
Use custom menus to set it up so that posts show up on individual pages unique for that class.
Join the Teacher Challenge on blogging with students
If you’d like more guidance and help with setting up your site (plus using it with students) then the Teacher Challenges are for you!
Check out the first overview post here that covers much of the above but in much more depth.
That’s it!
Let us know in the comments below if you have any questions and feel free to share a link to your class website too!

Does Edublogs allow for Import of site? If so, you could create a couple of class/course template site examples and make it even easier to create a new class site. *This would also work for eportfolio sites. You could create a standard eportfolio site, export it, and create a link to the Import file.
Hi there – sorry for just seeing you comment. You can import a site into Edublogs. On our Campus networks, you can also setup different templates that can be assigned to new blogs that will add all settings, default content, plugins, themes, and everything.
Hi Tracy!
The newest email subscription stuff (including the follow button) will be on all Campus sites soon – they are brand new to Edublogs.org Pro blogs now. 🙂
Hi Ronnie,
This is such an easy post to follow, and very practical to implement. I do have one question, I am having difficulty finding where to add the follow button. From our blogs.goaj.org Dashboard, I went to Subscriptions > Settings, but did not have that option, nor did my screen look like your screenshot. Was I in the wrong place?
Thanks for your time!
Kind regards,
Tracy