As James says “odds are you’ve noticed that Edublogs has just undergone a pretty radical upgrade – and that your admin area is looking a heap of a lot different!”
And I thought you might like a quick overview of the main changes since I’ve been working hard to get the new Help & Support section up to date.
Your Dashboard
The main area of your dashboard is now made of handy configurable modules such as Right Now, Quick Press, Recent comments — read using your dashboard to learn more about the cool features of each module !
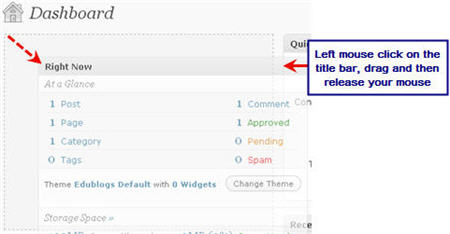
These modules can be moved by left mouse clicking on their title, dragging to the new location on your dashboard and then release your mouse button. You can also expand and collapse these dashboard modules by left mouse clicking on their title bar.
Your Navigation menu
 Your navigation menu is now on the left side of your administration panel.
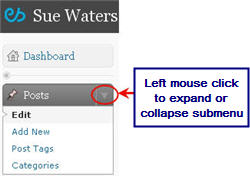
Each navigation item can be expanded or collapsed to view their sub menu by clicking on the arrow on the right hand side of the item.
Action Links
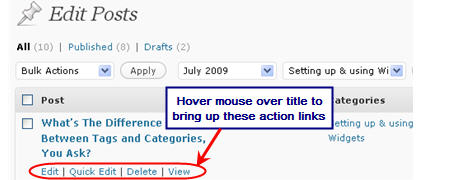
Your administration panels for managing features such as posts, pages, comments, and media now all use action links. Hovering your mouse over a title brings up the action links associated with that item and then clicking on the action takes you to the required screen.
For example, in the Edit Posts screen hovering your mouse over a title of a post brings up links for Edit, Quick Edit, Delete and View. Clicking on the action link Edit opens up the post allowing you to edit the post.
Uploading Media Files
Media such as images, video, audio and documents are still uploaded using the Add Media icons.
The main differences are:
- The Flash uploader is greatly improved (I’ve not experienced any problems or needed to use the browser uploader)
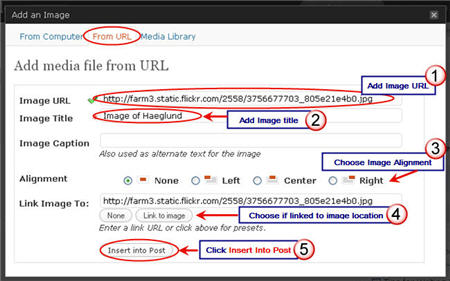
- There is no Insert/Edit Image button in your formatting toolbar. All actions of this button are now done completely using the Add an Image icon. For example, if you want to add an image by linking to an Image URL you now use the Add an Image icon.

- Once you’ve uploaded a video, audio or document file make sure you click File URL before clicking Insert into Post otherwise the link to the location of your file won’t be inserted into your post.

Adding Widgets to Your Sidebar
Your Design navigation menu has been changed to Appearance and this is where features such as Themes and Widgets are now located.
For blogs with more than one sidebar, all sidebars are displayed on the right hand side of your Widget screen. Clicking a sidebar expands it to show all its current widgets. This feature means you can add widgets to all your sidebars at the same time.
Widgets are added to a sidebar by dragging the desired widget to the desired sidebar. When added the widget opens up; all you need to do is configured it and then click Save. Click on Remove to remove a widget from a sidebar.
Accessing all your blogs
 Gone is the tabs for all your blogs along the top of your administration panel or “All My blogs” link.
Instead you need to go your My Blogs screen via Dashboard > My Blogs and then click on the link to the desired blog dashboard.
FINAL THOUGHTS
As I said this was just a quick overview of the main changes.
For more details check out our guide for Getting Started with Edublogs which can be viewed online or downloaded as handy PDFs! — I’m working hard to get it all completed…please send chocolate to keep my energy sustained
If you are enjoying reading this blog, please consider ![]() Subscribing For Free!
Subscribing For Free!


@Jackie Remis Spammers, who create lots of blogs to promote products, were using the JavaScript for redirects on free blogs. ‘No’ other blog hosts allows embedding like we have done so far and we’ve been forced to limit it due to this abuse by spammers. This is why embedding of Vokis are no longer working.
The key is we still want our users to have this ability but we had to provide it in such a way that the sploggers can’t use it.
The only solution was to link it to Edublogs Pro and Campus like we had to do with XML-RPC.
So what we have done is an Edublogs Pro is automatically able to embed all code including Voicethreads, Teachertube and is able to upgrade up to 50 blogs other blogs so that the 50 other blogs can also embed code, access premium themes and their ads are disabled.
You can read more about it here – http://help.edublogs.org/2009/09/01/difference-between-free-supporter-and-campus-blogs/
I want to add a VOKI to my edublog. I can’t get it to work. I followed your steps but when i click back to home page there are only the html.
Do I need a pro blog to use a voki
Help & Thanks,
Jackie Remis
All of my blogs are gone.
Just plain flat out gone.
@cmalbeuf, the username you have listed here isn’t attached to any blogs – it is just a username. If you give me some of your blog URLs I will locate them for you.
So far I really like your changes! One question…
When I did a makeover, I found that the margins in some of my previous posts did not fit in the space. How do I make sure that the margins in new posts don’t exceed the space available? Thanks!
@Mr. Miller, I assume you mean the image width? If so you need to resize the images before uploading.
Most blogs can cope with 450 pixels wide but others can cope with wider and some need narrower. I cheat by quickly taking a screenshot of a post and checking the width. But you need to be careful because if your theme is really narrow or wide and you focus on images for that width it makes it harder to change to a new theme later.
I’ve read and re-read and I’m having a difficult time installing widgets for which there is not a drag and drop icon. It seems as though all of the icons are pre-determined and there are no “generics” where we can add Twitter, Voki etc. Maybe I’m over looking it – but the instructions show a “PRESENTATION” button for adding the Clustermaps widget. I can’t seem to find that button. I was also wanting to add the NECC Newbie badge – but don’t know how. Any help would be GREATLY appreciated!
Sincerely,
Candace Townsley
I’ve figured out how to do the plugins to get the Widgets. Now I’m having difficulty adding badges-like the newbie badge and the web 2.0 ning badge etc.
THANKS!
Candace
@Candace Townsley, you need to add those using the Text widgets. I recommend you read through the section on this page about widgets especially check out the example of adding ClustrMaps using a Text widget.
I hate to bother you, but I posted on the forum, and no one helped me. I have deleted just about everything on my site (jhsenvirosci.edublogs.org), and it still says I have used 21.35 mb instead of 20.00 mb. I had this site before our space dwindled to just 20 mb. I had it back when it was 100 mb. So, anyways, it’s a new year, and I am trying to post things on this site, and it won’t let me. I know that the memory is probably cached, and if so, it should update, but it’s been over a month, and it is still not showing the correct space. I would just create a new page, but I already sent out all kinds of information to parents and kids with the current site name. I desperately need this to be fixed asap as I am moving quickly through the beginning of the year and have several special needs students, parents, and faculty who rely on this site.
Please help! And thanks for your time.
@haslamjhs, Just letting you know that James has responded to this in the forum thread.
Did we lose the font controls?
@riverarts, No you still have the advanced Formatting options that you display by clicking on the Kitchen sink button – refer to this page of the help material.
Would love to see a few improvements with Comments. ‘No Comments’ seems to indicate that comments cannot be made…it would be preferable to just have the word, ‘Comments’. Would be great to have the option to leave comments on pages as well as posts.
I’m having frustrations with image sizes and alignment. Large size is much to large and medium is too small. The sizes before the upgrade seemed to work ok. Alignment seems to be all over the place. I even have a heading from one post alongside the image of the next post.
@ahsb, You can leave comments on pages it depends on what theme you are using. Refer to this post for themes that allow comments on pages.
The previous version automatically only allowed your full size image to insert as 500 pixels. Which was fine if your blog post width was 500 pixels wide or less. However there are some blogs that are wider than this. The reason why they did this was to deal with the issue of people who upload photos from digital cameras without resizing. However with this version it has changed.
Regardless, where possible, you should always resize your image to the size you want to insert into the blog post. This gives you the best quality image for the purpose, and solves the issues relating to uploading directly from a digital camera.
Read this post about why you should resize all photos before uploading.
If you want the image to take up the full width of the post you normally need to make the image about 450 pixels wide. To wrap the image alongside text you need to use about 150-200 pixels.
yeah thanks for all of that it explains a lot and I now no a lot more cool tricks to use for my blog. I’m a blogger whos still at school and I’m really triying to learn as much as I can to help me with my blog.
Is there any way to correct obvious typos in someone’s comments before approving?
@tippit678, Yes read Managing, editing and approving comments. It is all explained there.
Sue,
I figured out the problem with the pdf. I was not clicking “link to image”. So, figured that one out.
I am sure I am forgetting or missing something new with the html code for widgets. We are dragging text box to the sidebar. Pasting HTML code. When we hit save for the code we paste, one of two things happens:
1. The code is cropped so that just one line appears.
2. The code is deleted entirely.
I have tried multiple saves…and also tried just closing the box without saving, etc. This is not working on four of the teacher blogs I have worked on.
What am I missing? Thanks for any help you can provide!
Theresa
@Theresa There was a problem with the text widgets which we fixed about 24 hours ago. Can I get you to try testing again?
I insert a music clip into my blog that plays until I post a new blog with a new clip. I have it set to start when the blog opens and then in the past when I wanted to post a new blog I went into the editor and opened edit quicktime. I would then change the setting from play automatically to don’t play automatically and all would be well. But that editor is now missing and I cannot find out where I go to change the autoplay from true to false. I tried doing it in html, but the autoplay function does not appear in the html. When I go to add media, I cannot find any place where I am allowed to edit. I do not know how to fix this. The posted this blog last week before the changes were made and this week everything looks different.
Cordially,
J. D.
@J.D Can you give me a link to the post so I can check it out?
@Sue Waters,
Dear Ms. Waters,
This is the link to the posting I was trying to change:
http://christophernorthjr.edublogs.org/2009/07/27/what%E2%80%99s-that-you-say/
I used my blog editor to turn off the music clip in this post and to set it to auto-play in the new post, but I have noticed that in Firefox the controller disappears. I would also like to know how to edit audio-visual clips from within the blog and not have to rely on the blog editor for that particular function.
Cordially,
J. D.
@J.D, normally we don’t recommend autoplay, especially if you have a lot on your blog, because it has been known to surprise readers and can slow down loading of your blog.
This is how we recommending inserting audio into your blog posts.
@Sue Waters,
Thanks. I had already checked out the instructions you link to but they do not answer my question, I know how to add audio, I just do not know how to edit what I have added, I guess the ability to edit has been removed. I am writing for students who know what to expect and the audio was something they enjoyed. Again, thanks.
Cordially,
J. D.
@J.D, yes unfortunately WordPress decided with these later versions to go for linking to the file which doesn’t give you the option to adjust. Probably related to the fact that there are so many video hosting sites and similar that provide embeds that you can use to achieve this.
like incoming links is now fixed.
@travesti, HMMMMMM- my incoming links still is not working???
Thank you very very much for this tutorial and the great update of Edublogs 🙂
I’m having difficulty getting my Google calendar on my banner. The text widget is not accepting the embedded code. Any ideas?
@kburdis, Can you give me your blog URL so I can check?
@Sue Waters,
When I try to paste the embedded code the text widget says, ” there are no options for this widget.”
All of my additional text widgets that were outside of the edublog assortment were lost with the update.
Here is my blog URL as you requested:
http://kburdis.edublogs.org/
By the way….the new home page layout is very easy to use and eye appealing.
@kburdis, Thanks for the blog URL. Looks like a theme issue. For now you will need to change to another theme. I’ve changed it to Edublogs default but you might to use another one.
You will see the text widgets you were using before at the bottom of the available widget area.
Nice, clean interface – easy to change over from the previous settings – congratulations on a great job!
Thank you so much for taking the time to create such a helpful post- I very much appreciate it! So far I am liking the new upgrades except it appears that my Incoming Links option is no longer working- any suggestions to get this up and running again would be very much appreciated- thanks!
anne marie
@annemarie80, Thanks and glad my posts help. Yes we are aware of the Incoming links and it is on the list.
@annemarie80, Looks like incoming links is now fixed.
@Sue Waters, thanks for the update- you are amazingly wonderful! Now it is telling saying “RSS Error: file_get_contents could not read the file” and it looks like I need to configure, but unfortunately I don’t remember how I do that- sorry! Could you point me in the right direction for those instructions. Many, many thanks!
anne marie
@annemarie80, Can I also bother you for tips on how to upload a SMART Notebook file onto my Blog. I keep getting this message-“File type does not meet security guidelines. Try another.” Thanks again.
anne marie
@annemarie80, Sigh 🙁 – well it was working. I will let them know. Also I noticed that James was in the forum this morning so he should have seen your message re-Notebook. I will discuss both of these issues with him on Monday.
@Sue Waters, Thank you soooooo much. You’re hep is very much appreciated!
@Sue Waters, Hi Sue-
Just wondering if yo were able to discuss my concerns with James? I am still encountering difficulty uploading SMART Notebook files and also continue to receive the error message for my incoming links option. Thanks in advance for your help.
anne marie
Wow! What a difference a day makes. I’m liking it so far, but haven’t “played” with everything yet (I can’t wait to try it all out.). I am happy to report that I can finally use the Flash uploader now (It never worked for me before.)
Like someone else said, I can’t seem to align my photos correctly. I hope this “bug” is easily squashed.
I would also like for all of my pages to appear instead of just 20 pages at a time. It’s a bit of a hunt to remember which page is on which page.
Thanks for keeping it fresh!
@Mr. H, Yes WordPress finally got this version of the flash uploader working properly and makes life so much easier. Not sure what you mean by pages? Do you mean inside your dashboard? If so just click on Screen options at the top of the page when you are in Edit page screen and change number displayed per page.
@Sue Waters, No, I have 102 pages for people to visit in the blog. In the dashboard, they only appear 20 at a time, and to edit one I have to sort through six or eight lists to find the page I want to edit. Before, all of my editable pages were in one list and I had but to scroll to find the one I wanted. Is that explanation confusing enough?
@Mr. H, That being said, I really want the image alignment bug to be worked out.
@Mr. H, Yes it is and just click on Screen options at the top of the page when you are in Edit page screen and change number displayed per page.
Can you please tell me more about what issue you are having with image alignment. If you are trying to access more advanced features you need to insert the image. The click on the image which brings up an image edit icon and click on the image icon. Then click on Advanced Settings.
Hi,
Why do I have to log in every single time I want to add a new post? Also when I am in the post and want to add my photos, I keep being asked to log in. If this is a new feature – then it’s ridiculous. If not I hope it can be fixed soon!
Overall though, I quite like the new look – flash and easy to use!
Brittany
@Britany, thanks for letting us know. Can you tell me if that is still happening? I did report it and it should now be fixed. Glad you like the new look.
Yeah, nice but since the upgrade I can’t add posts or reply to posts on the forum with my login. I want to do that because my ScribeFire is broken and it would seem so are many other blog posting tools because you have disabled /xmlrpc.php .
Fair enough if you are having serious issues and need to disable the core link to all offline posting tools, but you should be pro-active about warning us. I have wasted many hours over the past few days trying to troubleshoot my ScribeFire setup only to find this related forum post”:
http://edublogs.org/forums/topic.php?id=7448
Surely you can’t just leave it with ‘we might turn it back on in the next few weeks’. Understand that this will block many users who post to edublogs via a range of authoring tools… at least be pro-active in warning us and helping us understand when we can return to proper blogging!!
@mseyfang, Hi Mike, as I responded on the main blog we are aware of the forum login issue and it is being worked on.
We wouldn’t have disable xmlrpc.php unless it was absolutely necessary. The reason why I couldn’t provide a firm date is because a lot of it depended on when the upgrade happened and then the tweaking associated with upgrading. Once this done that I’ll be in a position to give an update.