Love it!? Hate it!?
Doesn’t really matter what you think of the new Google Reader interface…..
What does matter is they’ve changed some of the Google Reader functionality educators like to use.
So here’s my essential guide for what educators now need to know about using Google Reader.
Click on the following links to learn more:
- Intro to RSS and Google Reader
- Setting up Google Reader and adding subscriptions
- Managing Subscriptions using Folders
- Reading posts inside Google Reader
- Reading posts from Google Reader on an iPhone or an iPad
- Creating a blogroll using Google Reader
- Creating a public page using Google Reader
- Sending an item from Google Reader to your blog
Intro to RSS and Google Reader
 One of the smartest things you can do is learn how to use RSS well if you plan to work online with your students.
RSS isn’t dead, isn’t hard to learn and is an essential time saving tool for reading latest students’ work in one location quickly.
RSS is an acronym which stands for Really Simple Syndication.
In simple terms, RSS is a simple and effective way of keeping in touch when new information is added to a website without having to visit the website to check for new updates.
The most common RSS reader used is Google Reader.
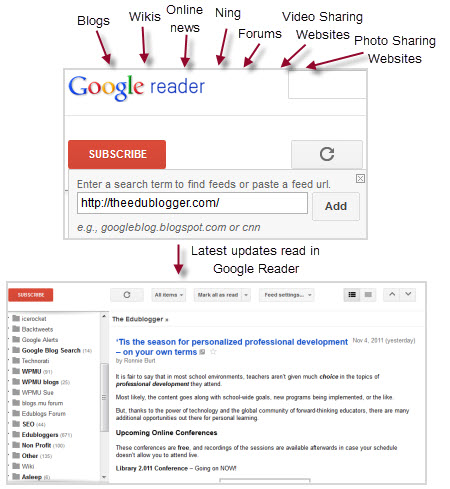
How it works is you subscribe to your favorite website using the RSS feed in Google Reader. Whenever new information is added to the website it is automatically sent to Google Reader where you can read it at your convenience.
For example, whenever your student or a favorite blogger or publishes a new posts on their blog, it is automatically sent to your Feed reader. Or whenever a student updates on your wiki or posts in your Ning it is automatically sent to your Feed reader.
Please note :
- Blogs on all standard blogging platforms automatically include RSS feeds and don’t necessarily use words or an icon to indicate the presence of the RSS feed.
- For all Edublogs, the rss feed for posts is found by going to yourblog.edublogs.org/feed and the comment feed is located at yourblog.edublogs.org/comments/feed
- RSS readers like Google Reader automatically detect your RSS feed from your blog URL so there is no need to know the feed URL.
Setting up a Google Reader account and adding subscriptions
1. Create a Gmail account (if you don’t have one)
2. Go to Google Reader and sign in with your Google Account
3. Add the blog to your Google Reader account by:
- Clicking on Subscribe
- Entering their blog URL
- Now click Add

You can also subscribe to all the comments published on student blogs by adding their student comment feed by:
- Clicking on Subscribe
- Entering their comment feed URL. For Edublogs blog you add comments/feed/ to the end of the blog URL. For example it should look like this http://theedublogger.com/comments/feed/
- Now click Add
You follow the exact same steps to subscribe to any other website that has an RSS feed. However, you’d normally locate the RSS feed you want to add and then paste in the feed URL.
Managing Subscriptions using Folders
Folders in Google Reader are like folders on your computer.
You use them to manage the different types of blogs and websites you read. Folders let you easily prioritise your reading and locate subscriptions.
For example, to manage student blogs you can set up different folders for student blogs from each class or a folder for Student Posts and another folder for Student Comments.
Setting up a folder in Google Reader is a simple as:
1. Hover your mouse over the blog title to display the drop down arrow.
2. Click on the drop down arrow to display the subscription options.
3. Select New Folder.
4. Name your new folder and click OK.

Adding subscriptions to your folder is as simple as:
1. Left mouse click on a blog title.
2. Drag the blog into the folder.
3. Then release your mouse to place it in the folder.

Alternatively, you can bulk add subscriptions to a folder using your subscription page:
1. Go to Options and select Reader Settings.

2. Click on the Subscriptions tab.
3. Select the subscriptions you want to add to a folder.
4. Click on drop down arrow next to More Actions and select the Folder you want to add the subscriptions to.
Reading posts inside Google Reader
Latest posts from the blogs and websites you subscribe are automatically added to your Google Reader when they’re published.
You read them inside Google Reader as follows:
1. Log into your Google Reader account
2. Click on the folder you want to read.

3. Make sure it is set to Expanded view so you see the full post.

3. The number of unread posts is shown in brackets next to the folder name.
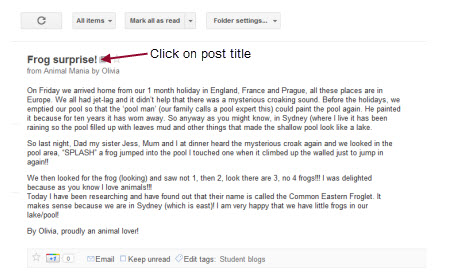
4. Just scroll down through the posts in the folder to read all posts.
5. As you scroll the posts will automatically be marked as read and the number of unread posts listed next to the folder name will decrease.
6. Just click on the post’s title to visit a post to add a comment
Reading posts from Google Reader on an iPhone or an iPad
 The easiest way to read posts inside Google Reader on an iPhone or an iPad is using a mobile app like Reeder.
Reeder syncs with your Google Reader account and automatically brings all unread posts into your Reeder app allowing you to quickly read through them on your iPhone or iPad.
Creating a blogroll using Google Reader
A blogroll is a list of links that you display on your blog.
Bloggers commonly use blogrolls to list their favourite blogs. Blogrolls help readers locate other blogs worth reading — you are saying “these are some blogs I like – which are worth checking out!”
Educators and their student commonly use blogrolls to link to all the student blogs in their class as it helps them easily locate and visit each others’ blogs.
Creating a blogroll using Google Reader is a faster way of adding a blogroll to all student blogs than adding the links inside each blog dashboard using Links > Add New.
Please note:
- Previously you could create blogroll by making a folder public
- Now you create a blogroll using a bundle
Here’s how create and add a Google Reader blogroll:
1. Hover your mouse over the name of a folder you want to create a blogroll from to display the drop down arrow.
2. Click on the drop down arrow to display the folder options.
3. Select Create a bundle.

4. Click Save.
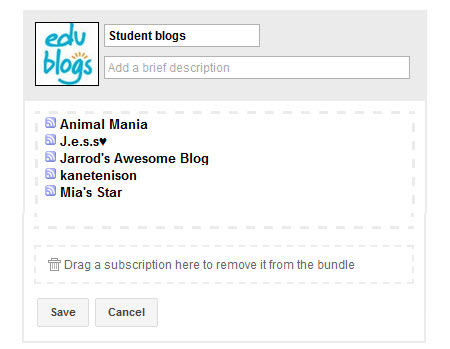
5. Click on Create a bundle clip.

6. Customise the blogroll title, select your color scheme and copy all the embed code.
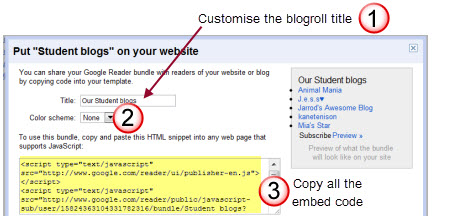
7. Now go to Appearance > Widgets in your blog dashboard

5. Click on the desired Sidebar to expand (so you can add the widgets)
6. Add a text widget to your desired sidebar.
- You drag by click on the widget with your left mouse and moving the widget.

7. The widget will automatically open — just paste all the embed code for your Google Reader blogroll, click Save and then Close.
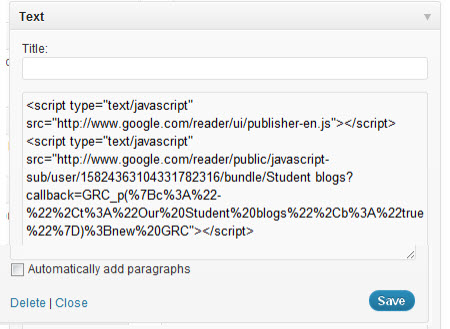
8. Now your blogroll will appear in your sidebar.
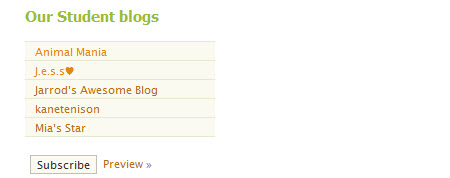
You add new blogs or remove blogs from your blogroll as follows:
1. Click on Browse for stuff
2. Click on View your bundles

3. Click on Edit underneath the bundle that holds your blogroll.

4. Drag and drop new blogs into the bundle or remove a blog by dragging it into the trash area.
5. Every change made in the bundle automatically updates in the blogroll on your blog.
Creating a public page using Google Reader
A public page is a place for you to collect any of your items in Google Reader that you want to share with other people.
Public pages are handy for educators who want their students to be able to read all posts from the student blogs in one location but don’t want their students to set up their own Google Reader account.
Please note:
- Previously you could create public pages by making a folder public
- Now you create a public page using a bundle
- If you’ve already added a Google Reader blogroll to your blog sidebar then the students can click on the preview link at the bottom of the blogroll to visit your public page and read the latest posts.
- To add and remove blogs from your Public page you need to edit your Bundle by following the instructions for editing your blogroll.
Here’s how create a public page:
1. Hover your mouse over the name of a folder you want to create a public page from to display the drop down arrow.
2. Click on the drop down arrow to display the folder options.
3. Select Create a bundle.

4. Click Save.

5. Click on Add a link.

6. Copy the URL from the address bar.

7. Now go to Links > Add New in your blog dashboard
8. Add a title for your Google Reader public page to the Name
9. Add your Google Reader public page URL to the Web Address
10. Select Blogroll in the Categories and the click Add Link
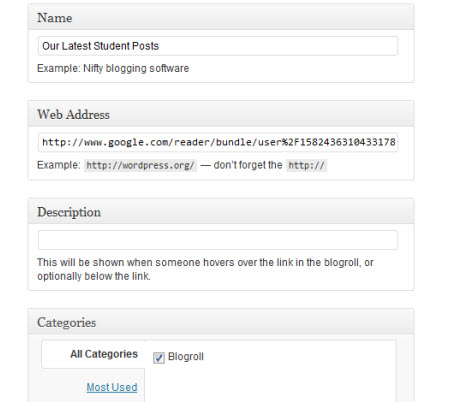
11. Now go to Appearance > Widgets in your blog dashboard
12. Add your links widget to your sidebar.
13. You should now see a link to your Public page and students just need to click on this link to read the latest posts.
How to send Google Reader items to your blog
There’s occasion when you might want to send interesting posts from Google Reader directly to your blog.
This is easily done using the “Send to” feature of Google Reader.
Here’s how you do it:
1. Go to Reader Settings in Google Reader.

2. In Reader Settings click on Send To tab

3. Click on Create a Custom link at the bottom of the page.
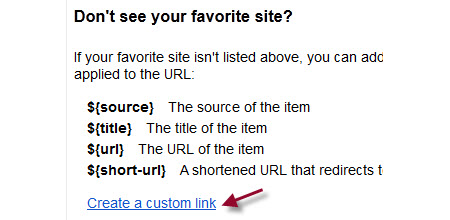
4. Add the Name of your blog, the URL in the following format and then click Save.
http://yourblog.edublogs.org/wp-admin/press-this.php?u=${url}&t=${title}&s=${source}

5. Now click Back to Google Reader at the top of the page.
6. You’ll now see a Send to link at the bottom of each item in your Google Reader account.
7. To send an item to your blog select the name of your blog from the Send to dropdown menu and presto it’ll open up in quick press view on your blog.

Final thoughts
What tips would you give educators for using Google Reader or RSS? What else would you like to know?
If you are enjoying reading this blog, please consider ![]() Subscribing For Free!
Subscribing For Free!




30 thoughts on “The Complete Educator’s Guide to Using Google Reader”