Adding your own digital media content to blog posts isn’t hard and it does spice up your posts — providing more variety for your readers!
Let me show you how easy it is to create a PhotoPeach and add it to a blog post.
About PhotoPeach
PhotoPeach is probably one of the fastest and easiest ways of creating a story or quiz using photos.
It’s as simple as:
- Uploading your photos
- Adding music
- Adding your captions.
Presto! You’ve created a story that you can embed as a slideshow into your blog post.
Here’s Examples!
- Look What’s Happening in Room 102! (Grade 2) PhotoPeaches:
- What we learned about Owls – students researched and designed their owls
- Working together to do maths – students learning about maths
- Mrs. Nessman’s class (Grade 1)
- The Mural has arrived – excellent example of using it to increase cultural awareness between collorabive classrooms in different countries
Below is a quick quiz I created with PhotoPeach:
How To Create A Quiz
Creating a PhotoPeach Quiz is really easy.
Here’s how it’s done:
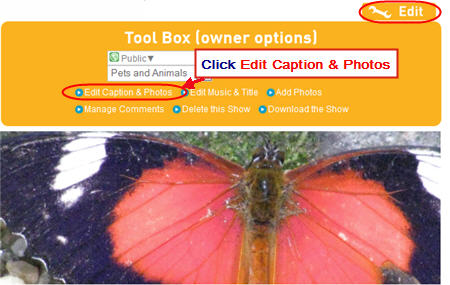
- Click on Edit once you’ve created your PhotoPeach
- Then click on Edit Captions and Photos
- Now click on each photo and then Quiz to add your questions
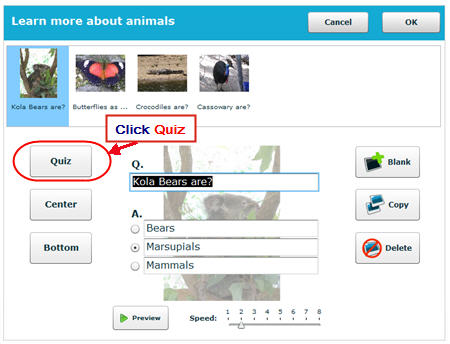
- When finished click OK
Disabling Comments
As Linda Yollis points out you can’t moderate comments on PhotoPeach.
You can turn off comments (if your prefer) by:
- Click on Edit once you’ve created your PhotoPeach
- Then click on Manage Comments

- Change setting to Don’t allow comments

How To Embed A Photo Peach
Embedding a PhotoPeach is the same as any other embed HTML code:
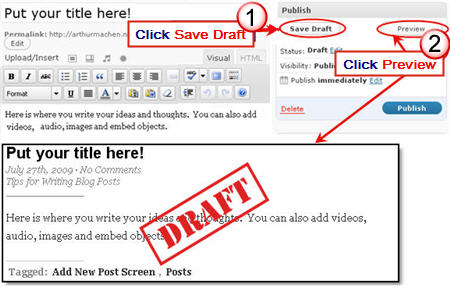
- Completely write your post including adding title, text, images, tags and categories.
- Click on Save Draft, previewed your post and make all necessary edits.
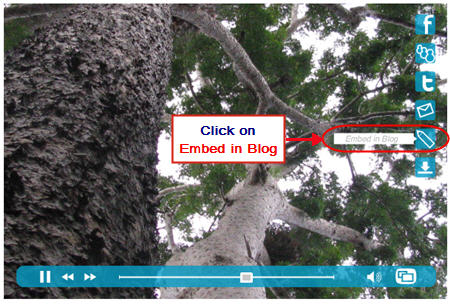
- Go to your completed PhotoPeach and hover your mouse over the PhotoPeach to bring up the menu items on the left hand side of the PhotoPeach.
- Click on Embed in Blog.
- Copy the Embed HTML code.
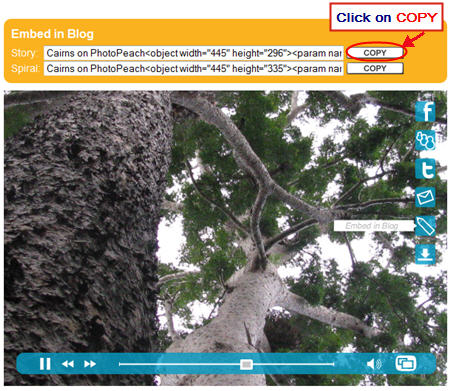
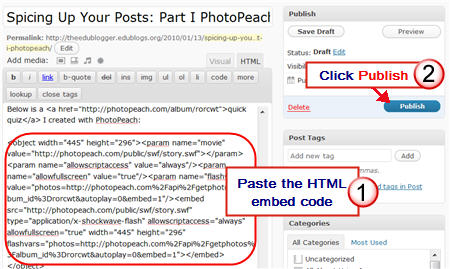
- Click on HTML Tab on your blog post.

- Paste the embed code for your PhotoPeach into your post where you want it to appear then immediately click Publish
- Don’t click back to Visual Tab before hitting Publish as it can break the embed code.
- Immediately close your post once you’ve published.
- Change back to Visual Editing mode when you write your next post by clicking on the Visual tab.
FINAL THOUGHTS
This is part of a series of spicing up your blog posts using digital media content.
Please share your cool examples of digital media that you’ve used in posts as we’d love to check them out!
If you are enjoying reading this blog, please consider ![]() Subscribing For Free!
Subscribing For Free!
May I use your excellent work as the guide to teach Kerala schools “How to use Photopeach in the classroom?”
I am from Cochin, Kerala, India. Active as Wiki Facilitator http://goo.gl/U1hTY and Chairman of GeoGebra Institute of Kerala http://goo.gl/7pHRN
Thanks everyone for your nice words about my post on PhotoPeach. It has been really popular and it is pleasing to see people spicing up their posts with some more embedded media.
Hi Sue,
I just wanted to stop by tho thank you for this great post on PhotoPeach.
It’s been very helpful and you are right: it definitely spices up our posts.
Dear Sue,
Thanks for another great post! I love using PhotoPeach, although I have not used the quiz function yet. You’ve given me a goal!
One thing I do when I publish a PhotoPeach project is turn off the comments. There does not appear to be a way to moderate the comments, so I shut them off as a precaution. It is very easy to do: click on Edit and then Manage Comments. Select “Don’t allow comments” and you’re done.
Appreciate all your help!
🙂
Linda Yollis
@Linda Yollis, Good to have given you a new goal. I had pondered adding disabling comments when I wrote the post but then changed my mind.
I’ve now added that to the post and acknowledged you (as always). Thanks as always for all your support Linda!
@Sue Waters,
I met my goal of creating a quiz using PhotoPeach! In fact, I like the feature so much, I’ve used the quiz a few times recently. Here is an example of a quiz from a Circle post we did last week.
Circle or Sphere?
Yesterday, I realized that I should be using PhotoPeach more because, as you said, it saves a lot of time. (No, I’m not being paid.)
I had a student who went whale watching and wanted to write about it on the blog. Usually, I upload all the pictures one at a time and then call the student up to let them type the text. It can be quite time consuming. As I was watching the photos upload, I thought, “What am I doing? This is taking so much time!”
I quickly opened up PhotoPeach. We loaded all the photos at one time from the child’s jump drive. We discussed choosing music…how the mood of a slide show is influenced by music…and she picked an appropriate song. I taught her how to click on a picture and add the text.
It was done in no time, and it looks great! (I had time to actually eat lunch!) Here’s a link to her post: Visit the Pacific Ocean!.
PhotoPeach not only spices up the blog post, but also saves teachers a lot of that precious commodity we call time.
Thanks for all your support, Sue!
Linda
@Linda Yollis, Thanks for that feedback and I’ve checked out those PhotoPeaches they look really cool.
Off course now I’m thinking what if Linda wanted to add her student voices to them? Well I think it can be done.
I’ve done it with Animoto you can check it out here – http://suewaters.com/2010/01/22/always-push-those-boundaries/
Chuckling that it might mean you wouldn’t get time to eat lunch if you did that though. Here’s how to use Audacity to record the voice – http://aquaculturepda.wikispaces.com/podcast4
Hi Sue
I have just published a PhotoPeach post using your excellent step by step guidance.
Many thanks!!
Janet
Wow! What a great tool. I’m completely geeked about this. Thanks for sharing!
-Chrisitna S.
LessonPathways.com Team Member