Your avatar is an important part of your online identity.
It’s an online representation of you that shows up in places such as where you leave comments or forum posts and is part of how others visualize who you are.
Most schools don’t allow students to use pictures of themselves on blogs or websites. Instead of photos most students create avatars that representative of them.
Uploading your comment avatar to your blog is easy — I’ll show you how in a second. But first let’s discuss online tools you can use to create your avatars!
For each tool I’ve included an example of the type of avatar they create and how to save the avatars (without creating an account and/or using an email address).
Important tips
Online avatar tools often create rectangular images while normally avatars are square.
Use an image editing program (such as MS Paint, Picture Manager or iPhoto) to make your image square before uploading.
For best results resize your image to 97 pixels wide by 97 pixels high.
![]()
Here’s information to help you:
- How to crop images using MS Paint
- How to resize images using MS Paint
- How to crop and resize using MS Picture Manager
Think carefully of how you want others to visualize you when choosing your avatar – it’s all about creating a positive digital identify!
Bless This Chick
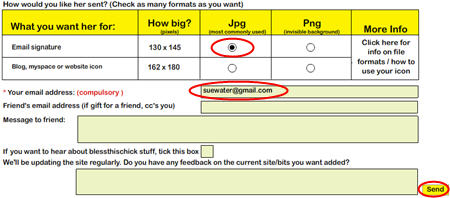
Bless This Chick creates really cute female avatar (and I had lots of fun creating mine).
Once finished it’s best to select jpg image option 130 x 146 pixels and then email to yourself.
Build YourSelf Wild
Build Yourself Wild can be used to create fairly conservative avatars (like my example below) or you can go totally wild by adding different animal parts to various areas of your avatar’s body.
To save your image:
- Click on I’m Done
- Now click on Print Your Wild Self
- This will display the print version of your avatar in a new tab or window of your web browser
- Right click on this print version and select ‘Save Image As’ or “Save Picture as’
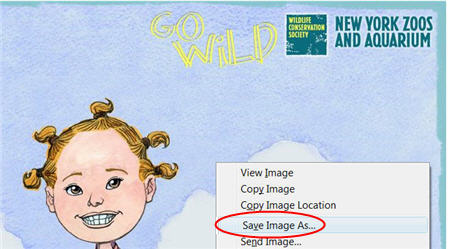
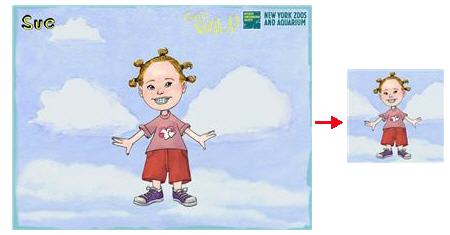
Image size created is 1024 pixels wide by 768 pixels wide.
Use programs like MS Paint or MS Picture Manager to crop your avatar into a square shape and then resize.
DoppelMe
 DoppelMe is relatively easy to use. Just click on each feature you want to add to your avatar and it is automatically added (or changed).
A few features are only accessible if you create a DoppelMe account and are logged in. However you can still create cool avatars (and save them) without an account.
Image size created is 100 pixels wide by 200 pixels wide.
To use your avatar’s full body it’s best not to add a background so you can make your image square.
To save your completed avatar:
- Right click on your avatar
- Select ‘Save Image As’ or “Save Picture as’
 Dream Avatar Creator
Dream Avatar Creator is also relatively easy to use.
Just click on each feature you want to add to your avatar and it is automatically added (or changed).
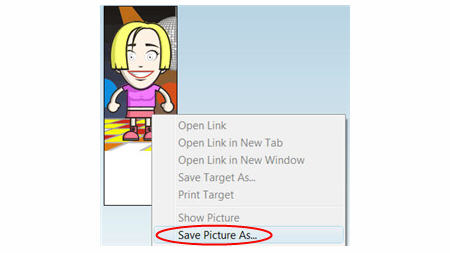
To save your completed avatar:
- Right click on your avatar
- Select ‘Save Image As’ or “Save Picture as’
Image size created is 120 pixels wide by 150 pixels wide.
Face your Manga
A good aspect of Face your Manga is that it creates square shaped avatars so you don’t need to crop or change your image shape.
Unfortunately some of the ads on this site aren’t necessary ideal – check suitability for your student first!
To save your completed avatar:
- Click on the PrtScn button on your keyboard (this takes a screenshot of your entire desktop) or click on Alt + PrtScrn to take a screenshot of the web browser page

- Open up MS Paint
- Hold your Ctrl key and then press V key to paste your screenshot into MS Paint

- Now just select the avatar and crop (Image > Crop) — then Save your image
On a Mac: use Apple (Command) Key + Shift + 4 to take a screenshot of your avatar only.
 Hero Factory
The Hero Factory creates action hero avatars.
Be warned the bodies of most females hero’s may be a bit too voluptuous (my avatar covered up 😎 ).
Once you’ve completed save your avatar using the PrtScn method – same as described above for Face your Manga.
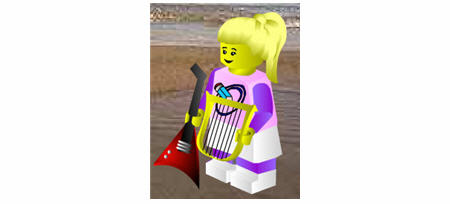
The Mini Mixer
The Mini Mixer creates a lego avatar – ideal for your lego loving students 🙂
Once you’ve completed save your avatar using the PrtScn method – same as described above for Face your Manga.
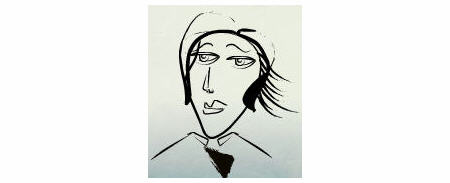
Mr. PicassoHead
Mr. PicassoHead creates a more artistic like avatar – ideal for those wanting something a bit different.
Once you’ve completed save your avatar using the PrtScn method – same as described above for Face your Manga.
Definitely fun — but I mightn’t be very artistic!
 Simpsons Avatar
The Simpsons Avatar is definitely for those lovers of the Simpsons.
Just create your own Simpson avatar then save it using the PrtScn method – same as described above for Face your Manga.
WeeMee
WeeMee is also relatively easy to use.
Just click on each feature you want to add to your avatar and it is automatically added (or changed). However terms of services are for over 13 years of age.
Once you’ve completed save your avatar using the PrtScn method – same as described above for Face your Manga.

TizMe
TizMe is also excellent fun for creating avatars however terms of services state for over 13 years of age.
Once you’ve completed save your avatar using the PrtScn method – same as described above for Face your Manga.

Uploading your Avatar
Now you’ve created your avatar uploading it to your blog is as simple as:
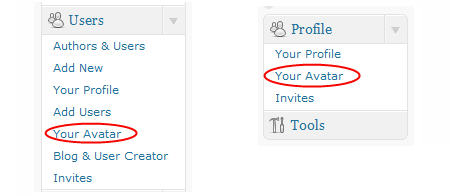
- Go to Users > Your Avatar or Profile > Your Avatar inside your blog dashboard
- Click on Browse, locate your avatar on your computer and click Open

- Now click Upload
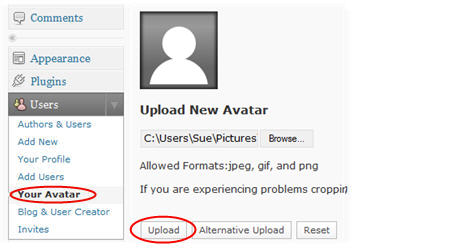
- Once uploaded select the part of the image you want to use as the avatar and then click Crop Image

- Now whenever you leave comment on your blog or (another Edublogs.org blog) your avatar will display with your comment.
![]()
Please note:
- If you have trouble cropping your avatar once uploaded – you need to upload again by click on Browse, locate your avatar and then click on the Alternative Upload button.
- Your new avatar mightn’t appear immediately on new comments – try holding the Ctrl key and pressing F5 to clear your browser cache
- For best results resize your image to 97 pixels wide by 97 pixels high before uploading.
If you are enjoying reading this blog, please consider ![]() Subscribing For Free!
Subscribing For Free!


You should check Yahoo! Avatars out as well. You need a Yahoo! ID though.
@Nathan Thanks for sharing how you create avatars with your students and your worksheets.
Your hand drawn avatar is my favorite still because it is something different.
@Sue
At the start of a school year one of the first assignments for my students is to draw their own avatar. I show them a variety of examples and make the point of how it becomes their online identity. I also try (with varying results) to impress upon them the importance of simplicity in design as the avatar will be really small once it is shrunk!
Here’s a worksheet I created for them to draw their own avatar:
http://portablepd.edublogs.org/files/2009/09/MyAvatars.pdf
I insist on the students making three different avatars and deciding on their favourite a day or two later. Here’s an avatar that worked well, in my opinion:
http://mrtoft.edublogs.org/2009/09/07/22s-avatar/
It’s an online delegacy of you that shows up in places specified as where you refrain comments or forum posts and is break of how others image who you are.
Most schools don’t permit students to use pictures of themselves on blogs or websites. Instead of photos most students make avatars that emblematical of them.
Uploading your mention avatar to your journal is light – I’ll pretending you how in a agreement. But prototypical let’s handle online tools you can use to make your avatars!
For apiece slave I’ve included an monition of the typewrite of avatar they create and how to forbear the avatars (without creating an ground and/or using an netmail tact).
—————–
mark
Hi Sue,
Thank you for such a detailed page on creating avatars. I found your page by following a link from Kerrie Smith. I love the Bless This Chick site. I have posted a link to your blog on my blog, I hope you don’t mind. Well at least I think I have (I am just starting out on this blogging adventure and am not really too sure yet of the do’s and dont’s of the blogging world).
Emma
@Emma Nicholls, Hi Emma, normally I would respond back under the comment on my post as that is good practice however in case you aren’t subscribe to responses by email I have also left a comment on your post.
Glad my road tests of Avatars helped.
Definitely not an issue linking to my blog. Linking to other people’s blogs is an important part of blogging. You have written about it properly. The key is you link to the person’s post like you have done and then talk about it in your own terms.
Where new people struggle is they can like a post too much and copy the entire post then paste in their post. That isn’t good etiquette.
interesting i will have to try. Go sue
Hi Sue,
Ahhh you’re right! I’ve overlooked the banner on Be Funky. I will have to update my blog post about this! Thanks for bringing it to my attention!
You can see how we’ve used student avatars on one of our voicethreads here http://2kmblog.globalstudent.org.au/2009/09/02/happy-fathers-day/
I don’t have a scanner in the classroom so I always photograph student work that I want to put on the blog etc.
Cheers,
Kathleen
@Kathleen McGeady, thanks for the link to your Voicethread and what cool avatars. I really hadn’t thought of how simple using a digital camera made it – my brain was thinking scanner.
I’m sure BeFunky didn’t always add the banner?
Dear Sue,
Thanks for a fantastic post about avatars. I have previously blogged about avatars here http://primarytech.globalteacher.org.au/2009/07/12/student-avatars/ but it was a very brief overview so I have now added the link to your very comprehensive post!
When using avatars for Voicethread etc this year I had my students draw a portrait of themselves which I then photographed and uploaded. These looked cute too!
Keep up your great posts!! (The one of spam recently was particularly useful!).
Kathleen McGeady 🙂
@Kathleen McGeady, I forgot that you had written a post about avatars. But checking your post made me realise that I had forgotten the Mini Mixer information I had prepared.
I love the drawn pictures as avatars. Hadn’t thought of a photo compared to scanning. Can I get the link to check them out on your VoiceThread?
Thanks as always re feedback on posts. Spammers have definitely being annoying me lately.
@Sue Waters, oops forgot to mention that the reason why I didn’t include BeFunky was because the free version was placing the banner across the image. Am I wrong about that?
😛 🙂 😀 :/ :'( :’) :’/
Im AWESOME and bored….at the moment:)